The Complete Guide to Appendix Carry
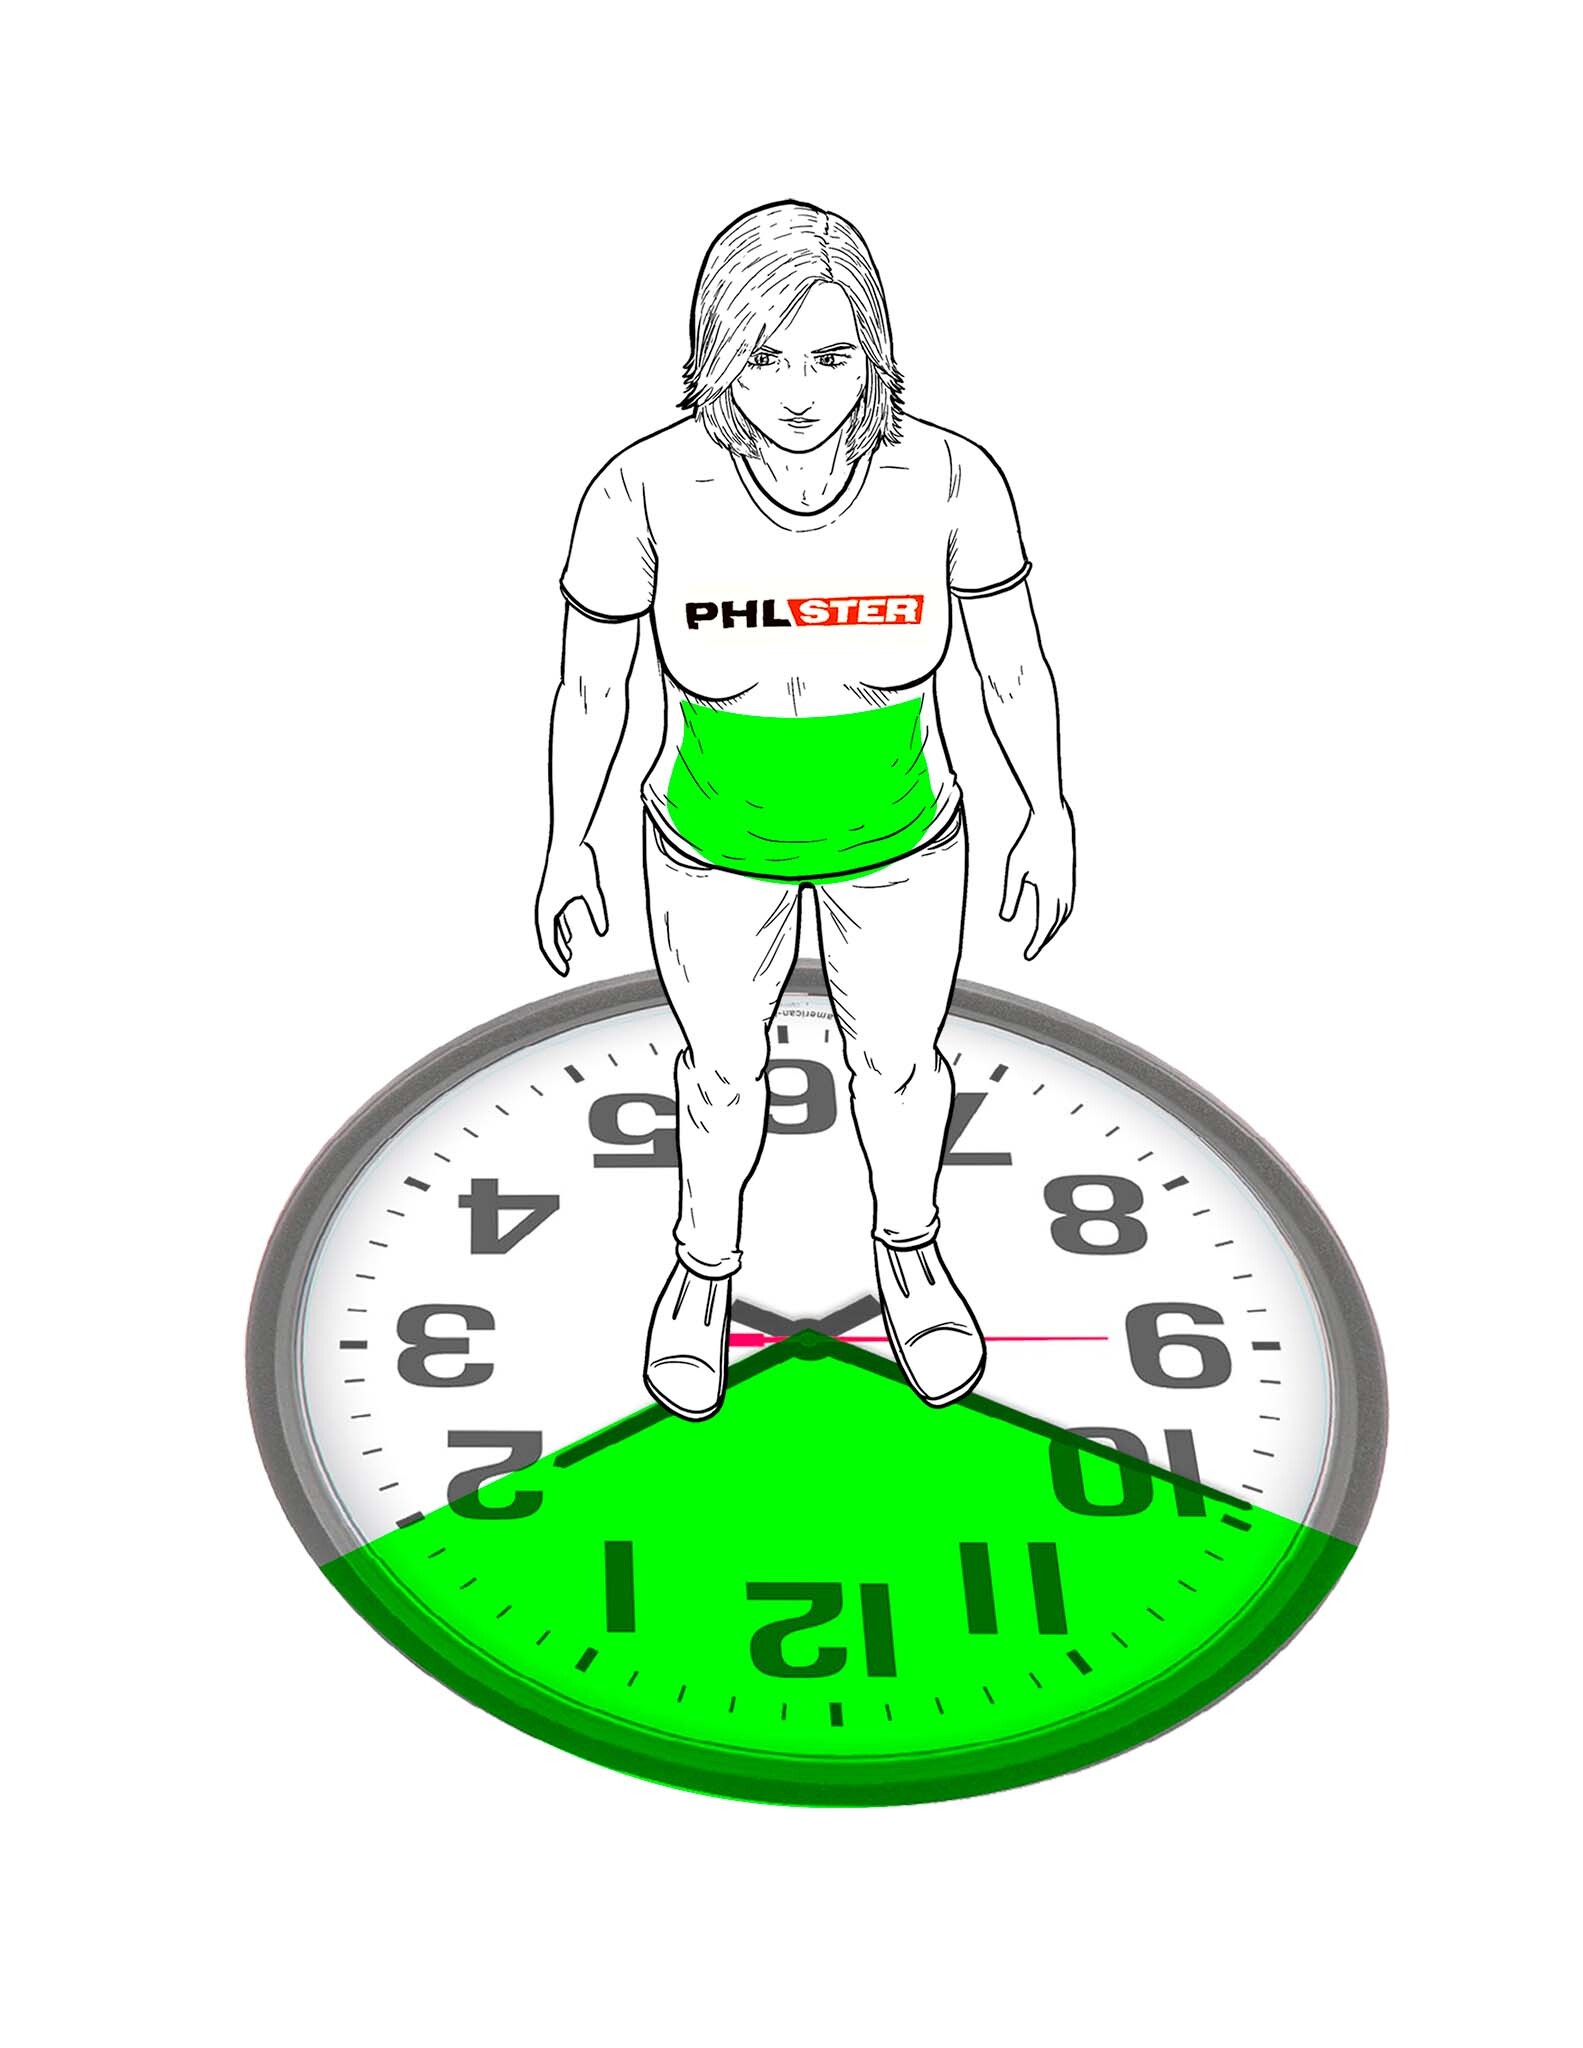
Appendix carry, also called AIWB (Appendix Inside the Waistband), is a method of concealed carry where the holstered firearm sits inside the waistband at the front of the body, typically between 10:00 and 2:00 on an imaginary clock face centered on your waist. The term “appendix” refers to the general area, not a precise position. It is one of the most popular concealed carry methods in the United States because it offers fast access, strong weapon retention, and excellent concealment potential when set up correctly.
But appendix carry doesn’t work automatically. A poorly positioned holster will dig, print, and shift no matter how much you spent on it. Good concealment is a skill, not a purchase. It starts with understanding how your body interacts with the holster, and it follows a repeatable, step-by-step process that works regardless of your body type, gender, or wardrobe.
This guide teaches PHLster’s Concealment Mechanics approach to appendix carry. These are universal principles: observable, demonstrable, and repeatable. They’ll help you diagnose concealment and comfort problems, solve them systematically, and skip the expensive trial-and-error cycle of buying holster after holster hoping one works.
Read the full Concealment Mechanics guide | Download the Concealment Mechanics Ebook (PDF)
Concealment Mechanics is PHLster’s system for setting up concealed carry — a repeatable, body-type-neutral method built on three principles: finding your Concealment Sweet Spot, maximizing Grip Rotation with a wing, and maximizing Grip Tuck with a wedge.
Is Appendix Carry Safe?
It’s a fundamental rule of gun safety that you never point a gun at something you aren’t willing to destroy. So it’s natural to question appendix carry: the gun points toward your femoral artery and groin, especially when seated. How can that be safe?
The answer comes down to the difference between handling a gun and storing it.
The firearms safety rules are handling rules. They apply whenever you actively manipulate a firearm. But when you properly store a gun (in a safe, in a locked case, or in a holster that meets the safety requirements) you render it unable to fire. A gun inside a quality holster is functionally inert. It cannot discharge on its own. That’s why you can place a cased gun on a table and walk behind it without getting shot. The same logic applies to a holstered gun on your body.
This is why the holster safety requirements are non-negotiable. Your holster must meet three minimum standards before you put a loaded gun in it:
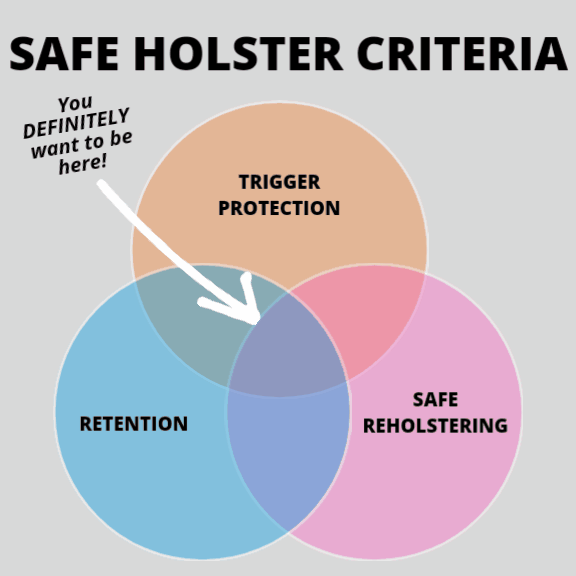
- Full trigger protection. The trigger guard must be completely enclosed by rigid material. You should not be able to manipulate the trigger from outside the holster, period.
- Retention through a full range of motion. The gun stays in the holster and the holster stays in a consistent position on your body through bending, sitting, running, and any activity you do while carrying.
- Safe reholstering. The holster must have a rigid, unobstructed mouth that stays open when the gun is drawn, so you can reholster one-handed without sweeping any part of your body with the muzzle.
When these three requirements are met, the gun is effectively stored. Risk increases only when you handle the gun, specifically during the draw and reholster. Reholstering is the highest-risk moment in appendix carry. Step back with your strong-side leg to blade your body. Tilt your hips so the holster muzzle angles away from you. Look the gun into the holster slowly and deliberately. Reholstering is not a race. If something catches on the trigger during a rushed reholster, your reaction time is not fast enough to stop the gun from firing. Slow down. Give yourself time to see and respond.
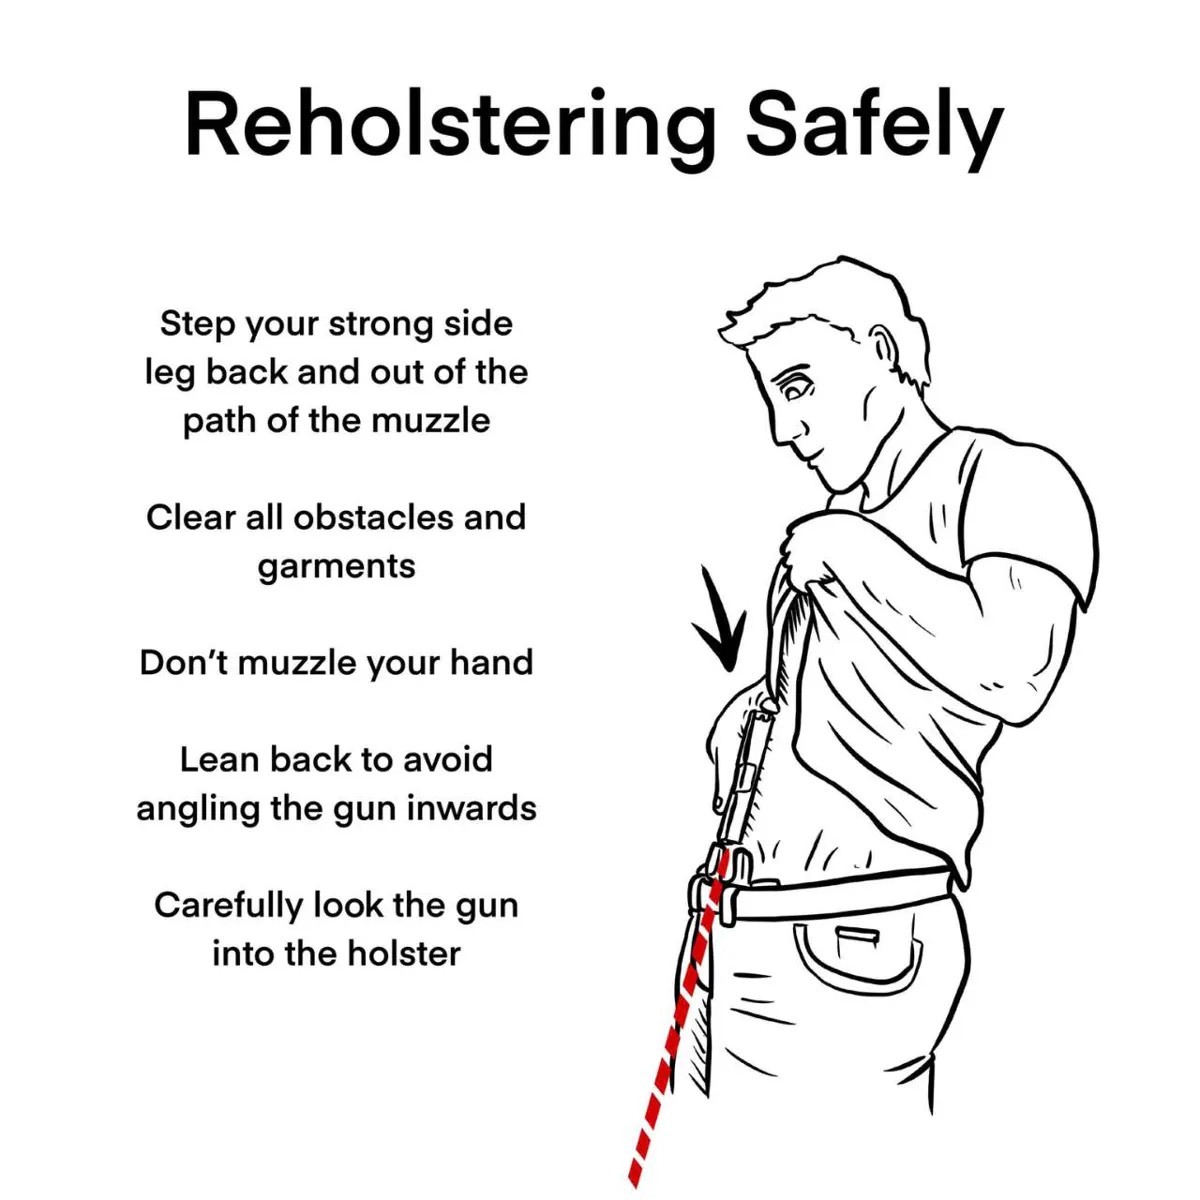
One useful holster modification: a wedge angled under the muzzle end tilts the gun’s muzzle away from the body, giving you a safer reholstering path with less exaggerated leaning.
PHLster Safety page | Concealment Mechanics — Safety section | Understanding Holster Retention
How to Conceal a Gun in the Appendix Position
Concealing a gun doesn’t start with buying gear. It starts with understanding three principles that determine whether your gun prints or disappears. These are the Concealment Mechanics, and they apply to every body type.
Step 1: Find Your Sweet Spot
Your body has natural peaks (areas where the body protrudes and clothing contacts) and valleys (areas where clothing drapes freely). Think of your torso as a landscape. Your concealment Sweet Spot is the valley where a gun hides best, where your shirt drapes over the holster instead of snagging on it.
Different body types have peaks and valleys in different places, which is why the “correct” carry position varies from person to person. You can’t copy someone else’s setup and expect the same results. You find your own Sweet Spot by looking at where your clothing naturally drapes, then positioning the gun in that space.
Before choosing a position, check that your gun isn’t too large for your available concealment space. The Concealment Percentage principle: if your gun’s grip height exceeds roughly 40% of your hip-to-hip measurement, concealment difficulty increases significantly. A gun that’s too big for your Sweet Spot will fight you no matter how good your holster and technique are.
Sweet Spot Guide (body type examples)

How to measure whether your gun fits your body. If the gun’s grip height exceeds roughly 40% of your hip-to-hip measurement, concealment becomes significantly harder.
Step 2: Get Grip Rotation
Once the gun is in your Sweet Spot, you might find that the grip still sticks out. That’s what causes printing: your shirt catches on the grip and the outline shows through your clothing. The goal is to make the most of the available space between the clothing and the body, so the pistol doesn’t disrupt the clothing. The first step is to cause the grip to rotate inward, flat against your body.
A holster wing (sometimes called a claw) makes this happen. The wing is a small lever attached to the holster. When belt pressure pushes the holster against your body, the wing converts that linear pressure into rotational force on the grip, pushing it inward. Without adequate belt pressure, the wing can’t function. PHLster’s Skeleton and Pro holsters include an adjustable Modwing designed specifically for this purpose.
Step 3: Get Grip Tuck
Even with grip rotation, the grip may not be fully pressed against your body. Sometimes, the above-belt portion of the gun can tip outward, due to both ride height and how your abdomen might push it away. Grip tuck is the final step: getting the grip tight against your torso so clothing flows over it without catching.
A holster wedge achieves this. Placed on the body side of the holster near the muzzle, a wedge pushes the muzzle end away from your body, which levers the grip and slide tighter against your torso. Where you place the wedge changes what it does. A wedge positioned to fill a gap between holster and body provides cushioning (fill). A wedge positioned as a pivot point creates more aggressive grip tuck (fulcrum). Experimenting with wedge placement and size is part of the tuning process.


Understanding the two ways a wedge works: as fill (cushioning a gap) or as a fulcrum (creating more aggressive grip tuck). Where you place the wedge changes what it does.
Diagnose Problems with Poke and Check
If your gun is still printing after finding your Sweet Spot, the Poke and Check method tells you exactly what to fix. Poke the outline that’s showing through your shirt. Which area of the gun are you pressing on?
If you’re pressing on the grip above the belt line, you need more grip rotation — check your wing and belt pressure. If the grip and the slide are printing, adjust your wedge. Poke and Check removes the guesswork. Instead of randomly swapping holsters, you identify the problem and apply the correct fix.
Concealment Mechanics (full guide with videos) | Concealment Mechanics Ebook (PDF)
How Body Type Affects Appendix Carry
The Concealment Mechanics principles apply to everyone. But because peaks and valleys are in different places on different bodies, the application of those principles varies. The same holster at the same settings will behave differently on different body types.
Above-belt abdominal weight (common male pattern): Tissue above the belt line creates a peak at or near 12:00, which pushes the grip outward. The Sweet Spot typically shifts more towards the strong side (12:30–1:00), where the valley forms beside the peak. The Keel Principle helps here since a longer holster balances better against a belly. Wedges are especially important for grip tuck because the belly actively pushes the grip away from the body.

How above-belt and below-belt weight distribution changes your optimal carry position and which adjustments to prioritize.
Below-belt abdominal weight: Tissue below the belt pushes into the holster body and muzzle, creating pressure points and discomfort. A higher ride height often helps. Belt pressure distribution changes because the tissue interacts differently with the holster’s contact points.
Petite frames: Smaller bodies have smaller concealment boundaries. Concealment Percentage becomes critical since a gun that works fine on a larger person may exceed 40% of a petite person’s hip-to-hip measurement, making concealment and comfort significantly harder. For smaller carriers, the size of the gun is critical.
Women’s body types: Different peak and valley patterns. Bust line creates different clothing drape. Hip-to-waist ratio affects where the belt sits and how pressure distributes. These are solvable with the same mechanics, but the Sweet Spot location and optimal settings differ. For women who don’t wear a belt daily, a beltless system like the Enigma removes the belt variable entirely.
Left-handed carriers: The same principles apply in mirror image. Your Sweet Spot is typically between 10:00 and 11:30 instead of 12:30 to 2:00. Ensure your holster is built for left-hand draw and that the wing and clip are configured for the opposite side.
The key takeaway: if your setup isn’t working, the answer is almost never “appendix carry doesn’t work for my body.” It’s more likely that your Sweet Spot, wing activation, or wedge placement needs adjustment for your specific anatomy. Start with peaks and valleys. Diagnose from there.
Appendix Carry for Big Guys | Muffin Top Fix | Sweet Spot Guide (body type examples)
How Wings, Wedges, and Belt Pressure Work Together
Wings, wedges, and belt pressure aren’t three separate features. They’re a system. Each depends on the others, and adjusting one changes how the others perform.
Belt pressure is the foundation. It’s the inward force created by the belt holding the holster against your body. Without adequate belt pressure, nothing else works — the wing can’t generate rotation and the wedge can’t hold position. This is why soft holsters and clip-only setups struggle. They can’t create the consistent pressure the system needs.
Contrary to popular belief, the best belt to use will have some flex. Since we’re trying to make the gun conform to the body, it helps to use a belt which conforms to the body. An overly stiff belt which retains its own rigid round shape can actually pull the pistol away from the body and not activate the concealment features of the holster. We’ve seen a lot of carriers struggle to comfortably conceal when using a heavy-duty “gun belt” for IWB or AIWB carry.

Why heavy-duty gun belts can actually hurt concealment. A belt that conforms to your body activates concealment features better than a rigid one.
Wings convert belt pressure into grip rotation. The wing sits behind the belt. When the belt pushes the holster inward, the wing acts as a lever arm that rotates the grip flat against your body. More belt pressure means more wing activation. If your wing isn’t working, check your belt tension before blaming the wing.
Wedges increase grip tuck. A wedge fills the space between holster and body on the muzzle side, tilting the grip inward. Wedge placement determines the effect. A wedge near the bottom of the holster acts as a fulcrum, creating more aggressive rotation. A wedge higher up acts as fill, cushioning a gap. Purpose-built wedges with an asymmetric taper (like the Wedge Rx) are shaped to balance tuck and comfort. A DIY wedge made from a folded sock works for testing placement before you commit.
When all three mechanics are properly tuned — belt pressure activating the wing for grip rotation, wedge providing grip tuck — you’ve reached your Maximum Concealment Potential for that gun and holster combination. This is the setup that gives you the most wardrobe freedom. From that baseline, even a thin t-shirt can work.
TIP: If you feel like your belt is always uncomfortably tight and restrictive, that’s a sign that your wing and wedge need further adjustment. Those elements should be accomplishing concealment with a normal and sustainable degree of belt pressure.
Wedge Rx | Holster Wedge Buyer’s Guide | How holster wings work | How holster wedges work
The Keel Principle: Why Longer Holsters Conceal Better
Short-barreled guns — subcompacts, micro-compacts — are top-heavy. The grip outweighs the muzzle end, so the grip tips outward away from the body and prints. Most people assume a shorter holster is better, but the opposite is often true.
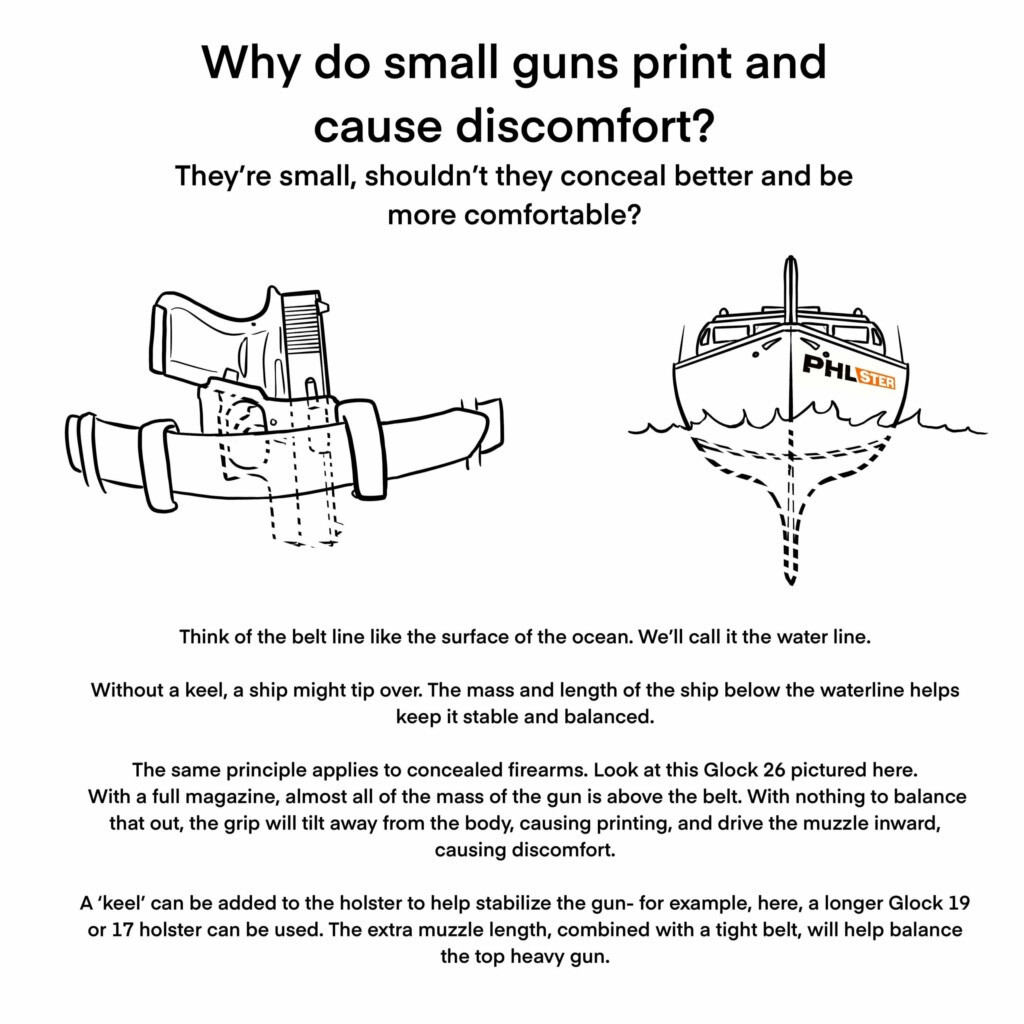
The Keel Principle: adding holster length below the muzzle counterbalances the grip, like a keel on a sailboat. The extra length distributes the holster’s contact against your body more evenly, which reduces the grip’s tendency to tip outward. The result is better concealment and, for many body types, better comfort — especially if you have a belly, which tends to push the grip out and make the muzzle dig in.
Longer holsters also work better with wedges, because the added length gives the wedge more surface area to create its fulcrum effect.
One trade-off to note: extra muzzle length reduces grip printing but can increase muzzle printing, especially with tight-fitting pants or low carry positions. It’s a balance, not a universal fix. But for most appendix carry setups with subcompact or compact guns, the Keel Principle is worth testing.
Getting Comfortable with Appendix Carry
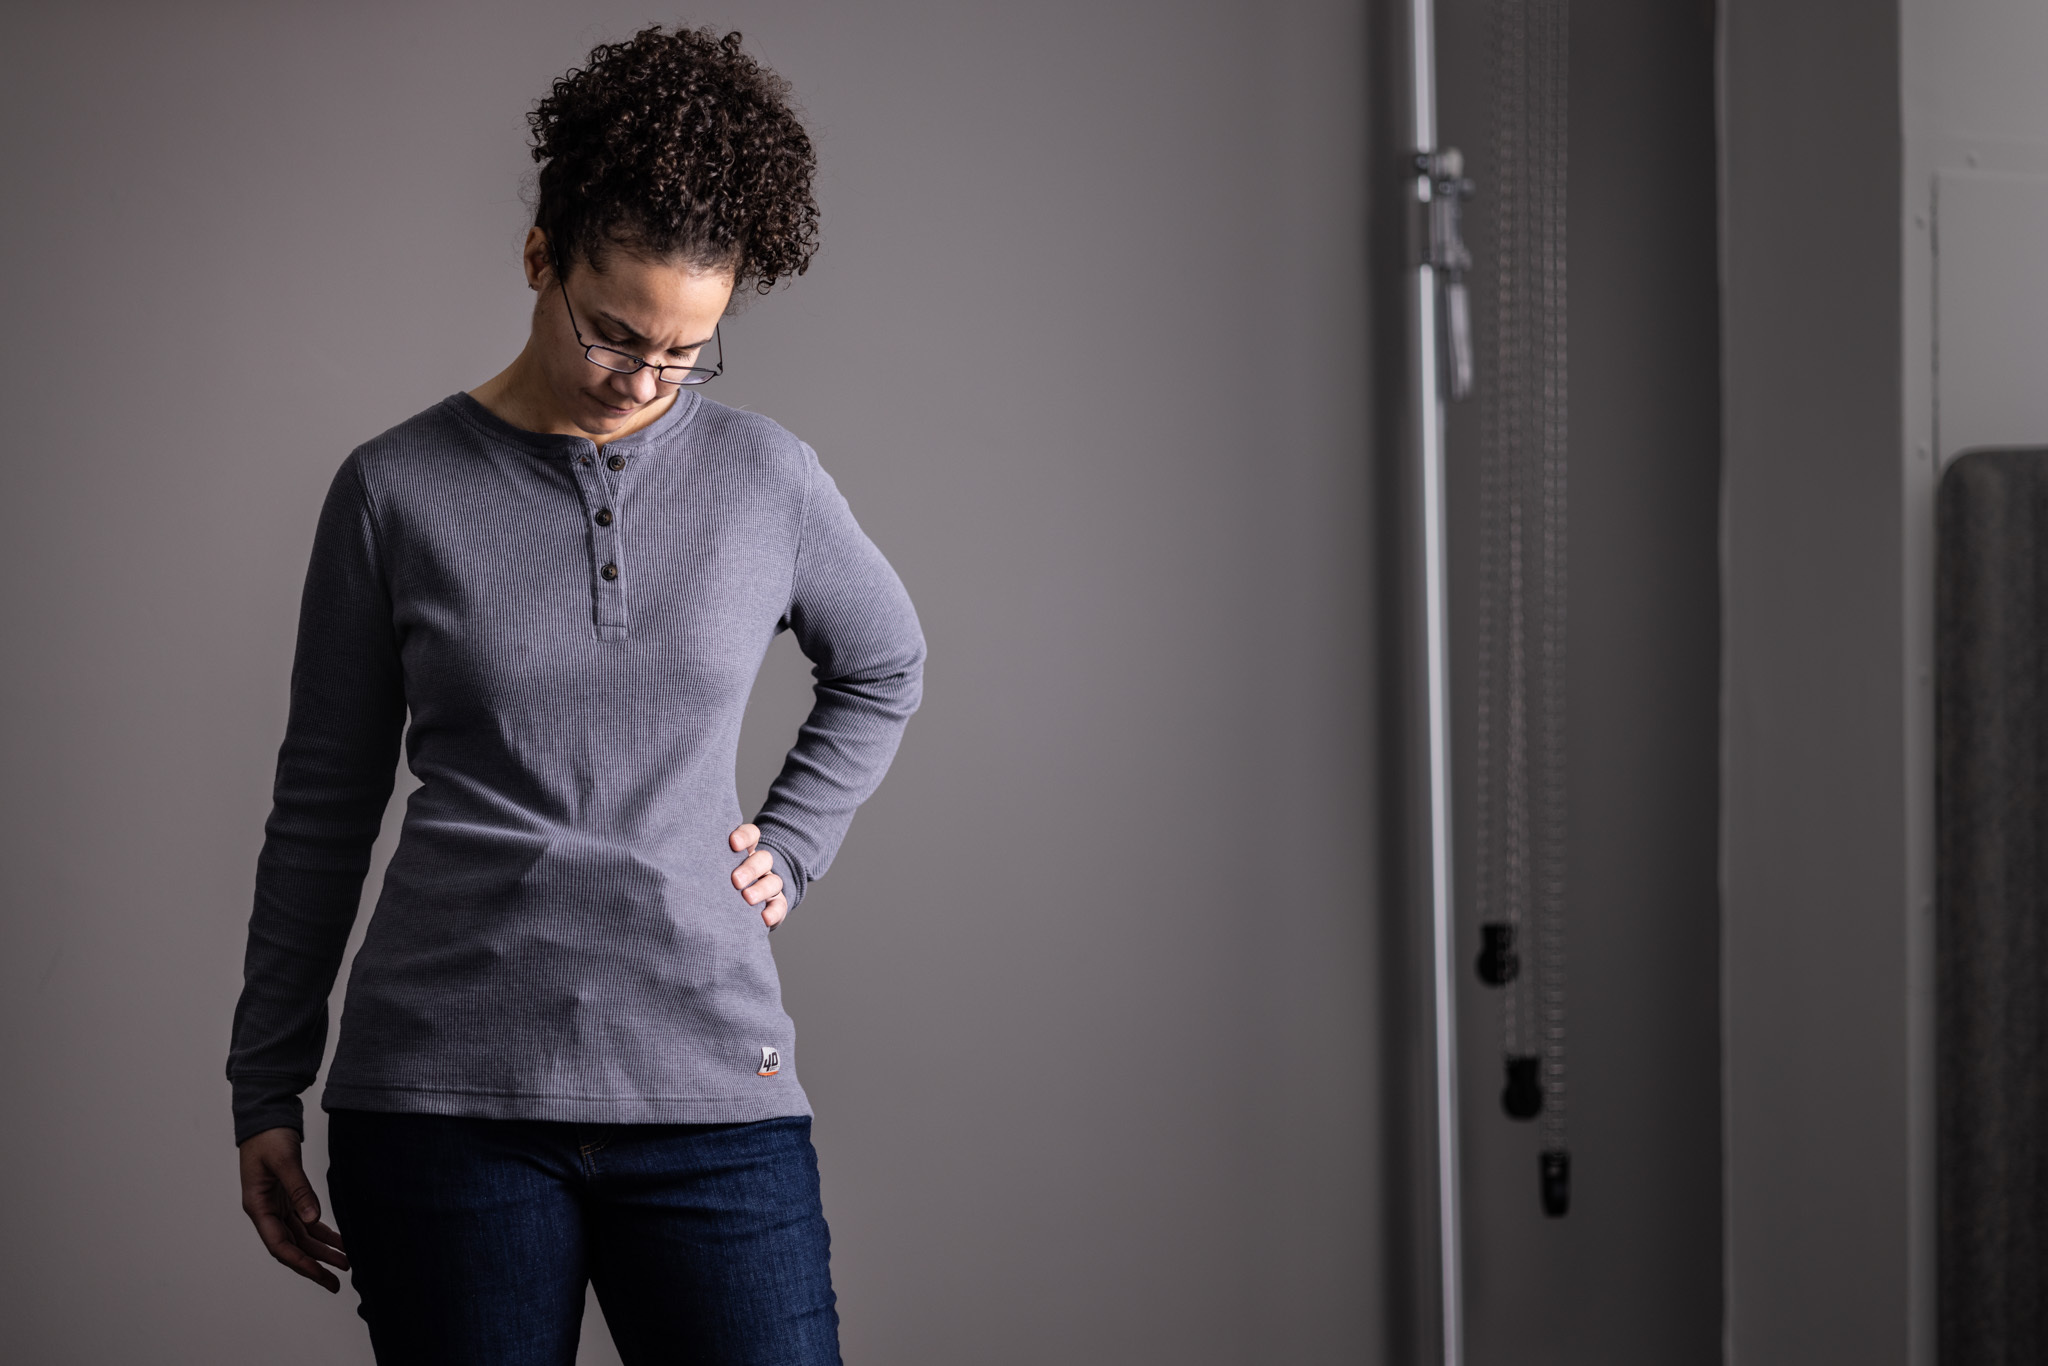
Comfort is the most common reason people quit appendix carry. In nearly every case, the discomfort comes from a setup problem, not a fundamental incompatibility with the carry position.
Comfort is a skill and a process, not a product you buy. Pain is not normal. It’s not something you have to “get used to.” If your holster hurts, something is set up wrong, and it can be fixed.
Start by finding your comfort boundaries. Your body has a zone where the holster can sit without interfering with movement — away from joints, on a surface area large enough to support the weight, with full range of motion preserved. This is also your concealment boundary. Finding the right ride height and centering within this zone is the first step.
The most common error is carrying too low. When the muzzle extends too far into the crease of your hip or thigh, it digs in when you sit or bend. Raise the ride height first. This single adjustment resolves the majority of appendix carry comfort complaints.
The best way to find your comfort boundaries is to begin in the seated position. Since one of the most common AIWB comfort issues occurs when seated, start this process by locating the pistol in a position where it doesn’t interfere with your legs, belly, or anatomy when seated. And then fine tune from there.
Keep the Concealment Percentage in mind here too. If your gun exceeds roughly 40% of your hip-to-hip measurement, you’ll likely have both comfort and concealment issues. The gun may simply be too big for your available space. Trying a smaller gun or a different holster length (Keel Principle) may be more effective than endlessly adjusting settings.
One more thing worth noting: sometimes the “discomfort” isn’t physical. New carriers who aren’t yet confident in their knowledge, skills, or gear often perceive novelty as discomfort. Since most sources of discomfort have a corresponding concealment symptom, too, it’s common for new carriers to be both physically and mentally uncomfortable until they develop the skills to control both comfort and concealment. Once those two areas are addressed, don’t try to just “get over it,” and accidentally ignore a real issue. Look out for pressure points and friction when carrying for long periods of time. Those are problems to solve, not to tough out.
Concealed Carry Comfort Explained | Concealment Mechanics — Comfort section | Enigma Tune-Up Class (free, live coaching)
Beltless Appendix Carry
Every concealment mechanic described in this guide depends on belt pressure. So what happens when you can’t wear a belt? Gym clothes, medical scrubs, dresses, yoga pants, athletic wear — none of these have a supportive waistband.
A beltless carry chassis is a dedicated concealed carry system that generates its own belt pressure independently of the wearer’s clothing. The PHLster Enigma is the most widely used beltless carry chassis available. It wraps around your body with a dedicated waistband and leg leash, and your holster attaches to a thin, flexible faceplate that holds the gun against you. Your clothing sits on top, completely separate from the carry system.
Because the Enigma generates its own pressure, all the concealment mechanics still function. The wing activates. The wedge holds position. You can find your Sweet Spot and tune your setup the same way you would with a belt-mounted holster. The only difference is the pressure source.
The Enigma works across a wide range of body types. PHLster offers a free, live Tune-Up class via Zoom where concealment coaches help you find your Sweet Spot and dial in your Enigma setup — no matter your size, shape, or experience level.
PHLster Enigma | Enigma Express (includes holster) | Concealed Carry in Scrubs | Free Enigma Tune-Up Class
Frequently Asked Questions
Can you appendix carry with a belly?
Yes. Abdominal weight changes where your peaks and valleys are, which shifts your Sweet Spot — but it doesn’t disqualify you from appendix carry. People with above-belt weight typically find their Sweet Spot biased to the strong side, around 12:30–1:00. The Keel Principle helps, because a longer holster balances better against a belly. Wedges are especially important for grip tuck. For a detailed breakdown, see our Appendix Carry for Big Guys guide.
Is appendix carry safe?
When your holster meets the three safety requirements — full trigger protection, retention through a full range of motion, and safe reholstering — the holstered gun is effectively stored and cannot fire. Risk increases only when you handle the gun to draw or reholster. Use proper reholstering technique: step back, tilt hips, look the gun in slowly.
What is the best holster for appendix carry?
Look for a holster that works with the concealment mechanics: a wing to convert belt pressure into grip rotation, compatibility with wedges for grip tuck, adjustable ride height to dial in your Sweet Spot, and a rigid holster mouth for safe reholstering. For a full walkthrough of holster safety and selection, see the Concealment Mechanics guide.
Do I need a special belt for appendix carry?
You need a belt stiff enough to generate consistent belt pressure. Belt pressure is the force that activates the wing and holds the wedge in position. We’ve observed the most success with belts that are flexible enough to conform to the body, while having enough structure to keep the holster in place during the draw. Stiff, rigid, “hula-hoop” gun belts are not necessary. See our Best Belts for Concealed Carry guide for specific recommendations.
What is a holster wedge?
A wedge is a shaped pad that attaches to the body side of the holster near the muzzle end. It increases grip tuck by pushing the muzzle away from your body, which levers the grip tighter against your torso. Wedge placement determines whether the wedge acts as fill (cushioning a gap) or fulcrum (creating more aggressive tuck). See our Holster Wedge Buyer’s Guide for sizing and placement guidance.
Is appendix carry better than strong side (4 o’clock)?
Each position has trade-offs. Appendix carry offers a faster draw stroke, easier concealment verification (glance down instead of reaching behind), and the gun stays in your line of sight. Strong-side carry can be more comfortable when seated for some body types and may feel more natural for people transitioning from open carry. Both positions use the same concealment mechanics — Sweet Spot, grip rotation, and grip tuck — but the optimal settings differ. Many experienced carriers choose appendix for everyday concealment because of the access speed and ease of concealment checking.