Written Instructions - Light Bearing Enigma LH
- Mar 3rd 2025
- By
These instructions are for the Light Bearing PHLster Enigma, left handed assembly. If you are right handed, you can find right handed Light Bearing Enigma assembly instructions here.
Please go here for video assembly instructions.
SAFETY WARNING: Make sure your holster is compatible. Do not modify, drill, sand, or cut your Enigma faceplate in ANY way. Do not drill or modify your holster. Thoroughly read the Enigma safety page and holster fit guide before continuing. Failure to fully read and follow ALL of these instructions can result in severe injury or death.
HOLSTER COMPATIBILITY: Please note that you must have a compatible holster shell for the Light Bearing Enigma before beginning. Check your holster against the holster fit guide before you begin. If your shell does not fit, STOP and review the fit guide before continuing. DO NOT drill, cut, or otherwise modify your holster shell in ANY WAY. DO NOT attempt to use a holster that doesn’t meet ALL requirements in the fit guide. DO NOT attempt to use a holster with the wrong wing. Contact PHLster customer service if you have any questions or concerns.
If your holster doesn’t meet the fit requirements exactly, DO NOT try to “make it fit” or “make it work.” Close enough is NOT good enough. Using the wrong holster could lead to premature breakage or sudden failure. If your holster fails, it could result in severe injury or death. Do not mess around when your life is on the line.
Table of Contents
Tools Needed:
- Phillips Screwdriver
- Pliers or vice grips
- Wide rubber band, rubber glove, or other similar grippy object
V1 vs V2 Versions
These instructions can be used for both V2 and V1 Enigmas. The faceplates are identical in shape, and all parts are interchangeable. You can follow these instructions if you have either faceplate.
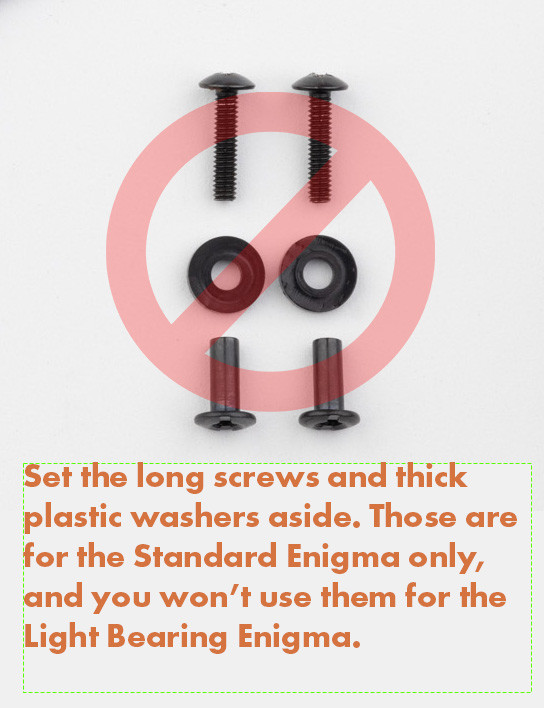
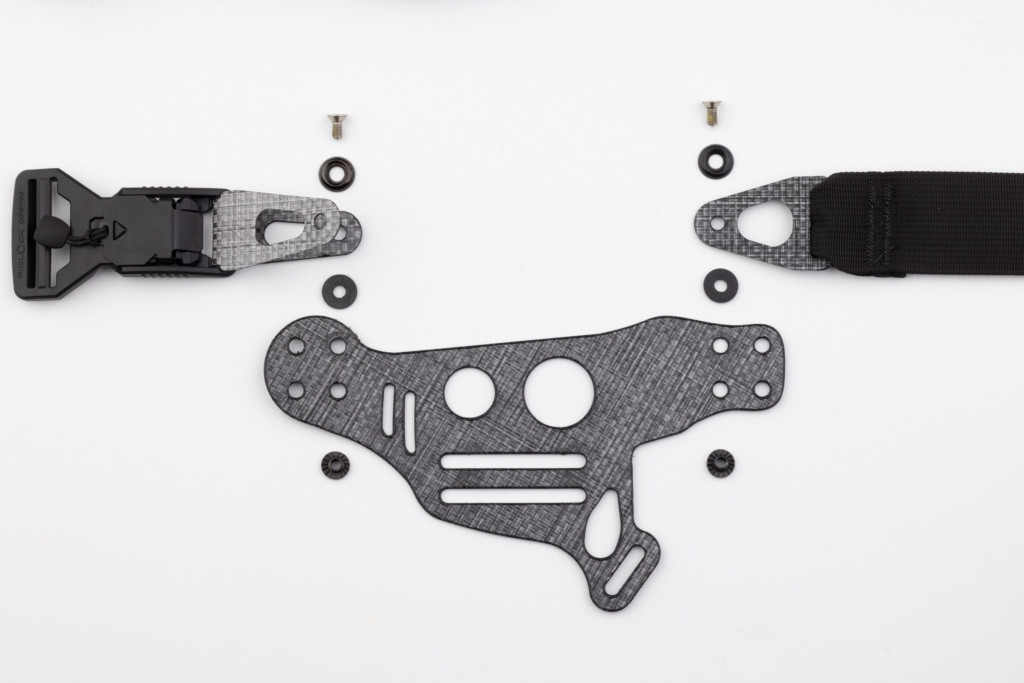
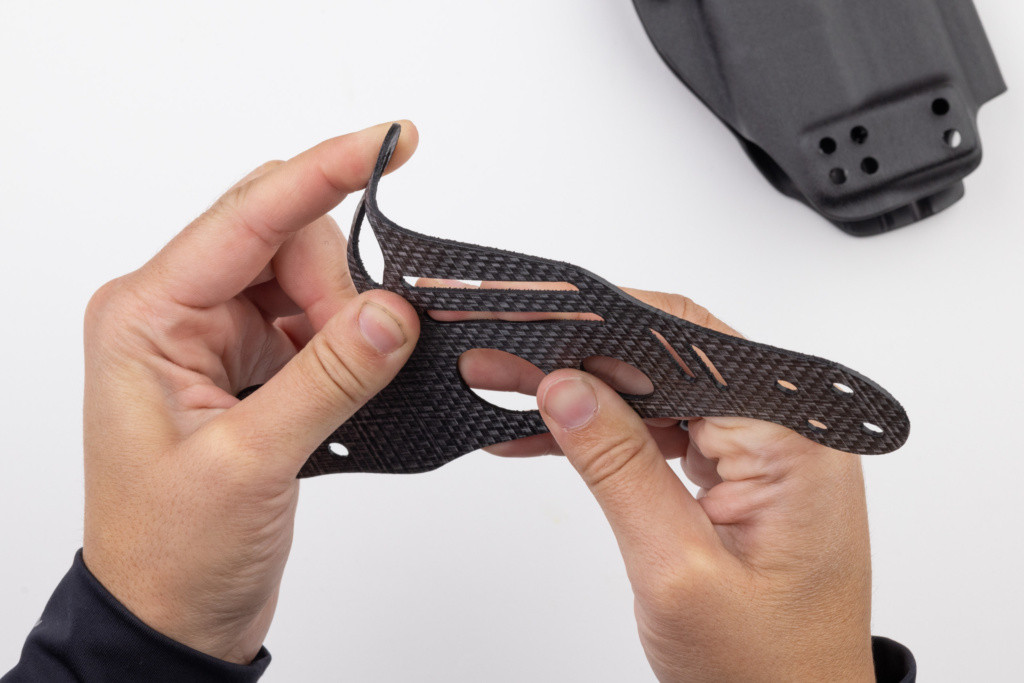
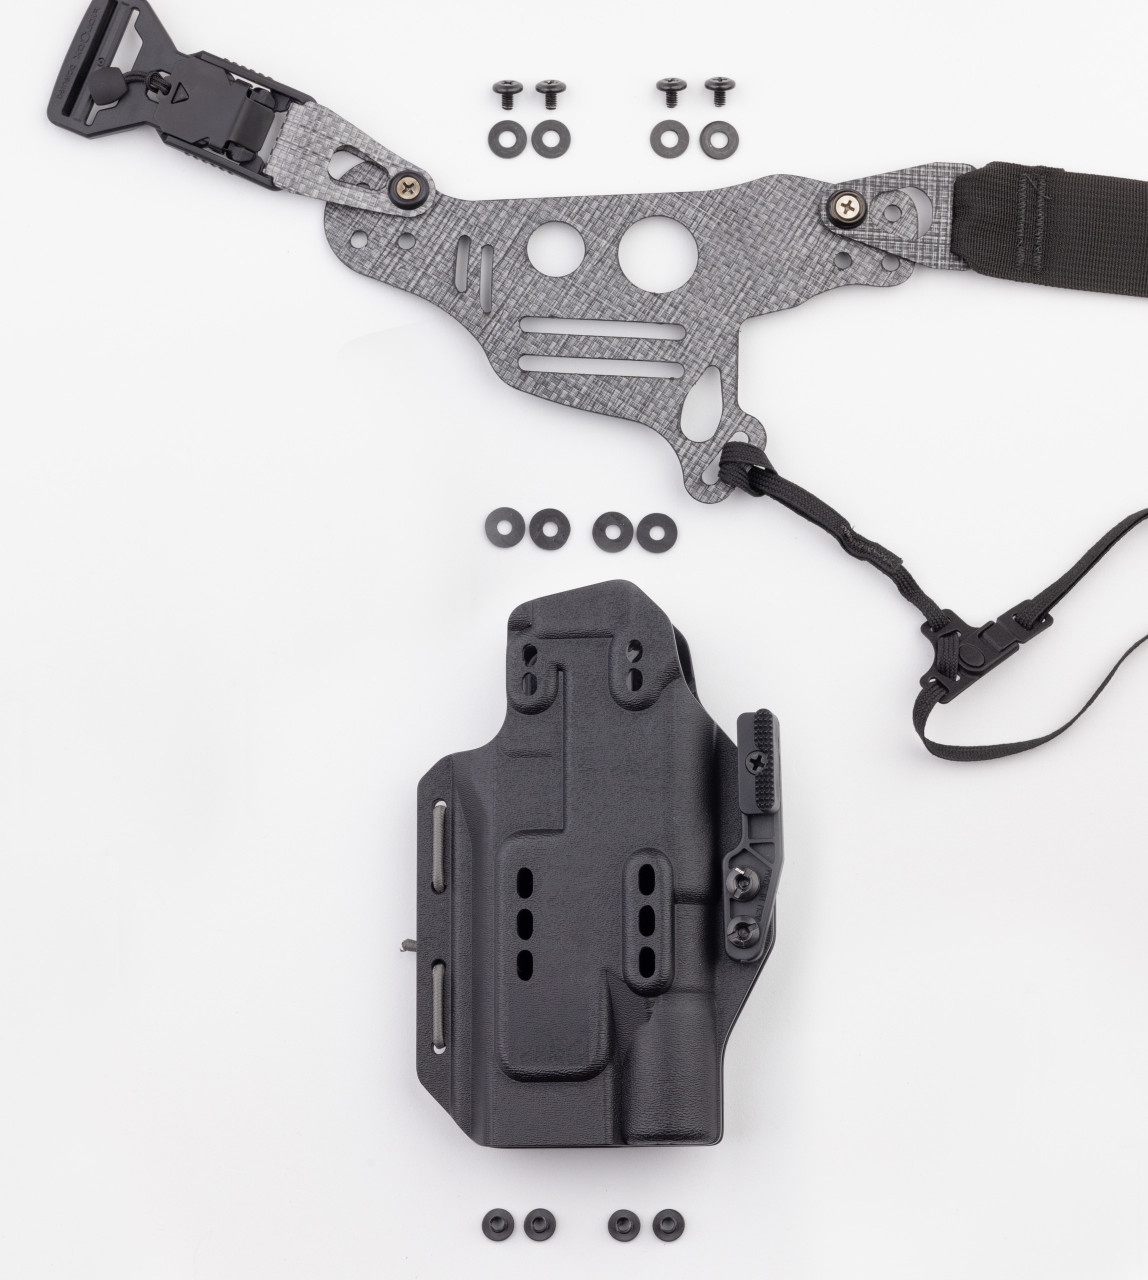
1. Light Bearing Enigma – Extra Hardware:
IF your Light Bearing Enigma (LBE) came with two bags of hardware, then the six pieces shown below are extra, and will not be used for LBE assembly. You can set them aside now.
- Long pan head screws
- Thick plastic spacers
- Long screw posts
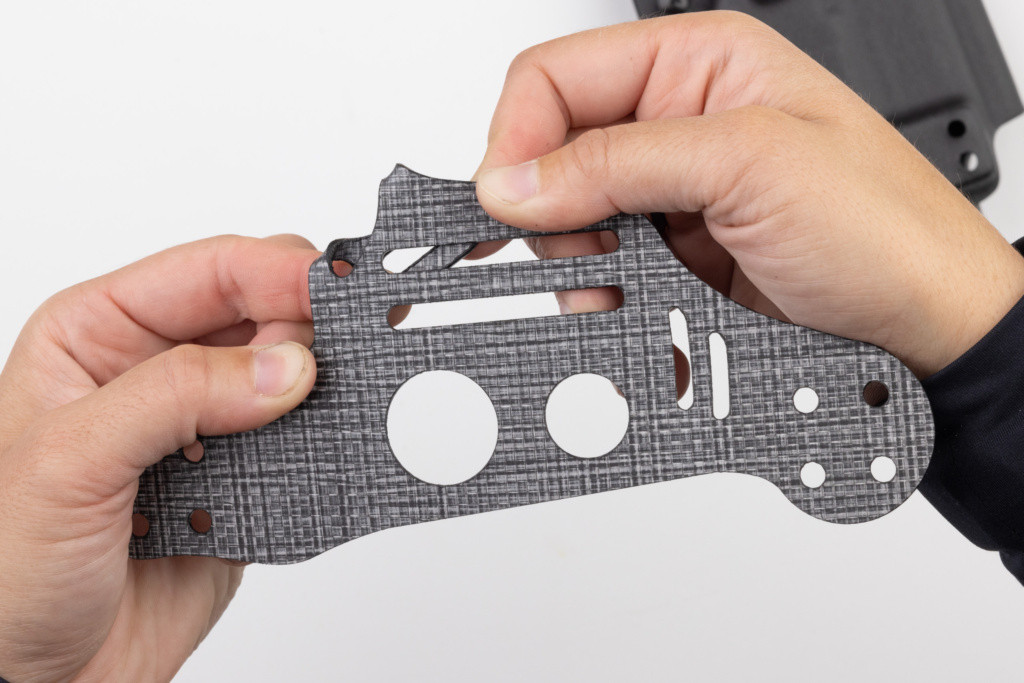
Here are the pieces you will use for your LBE assembly:
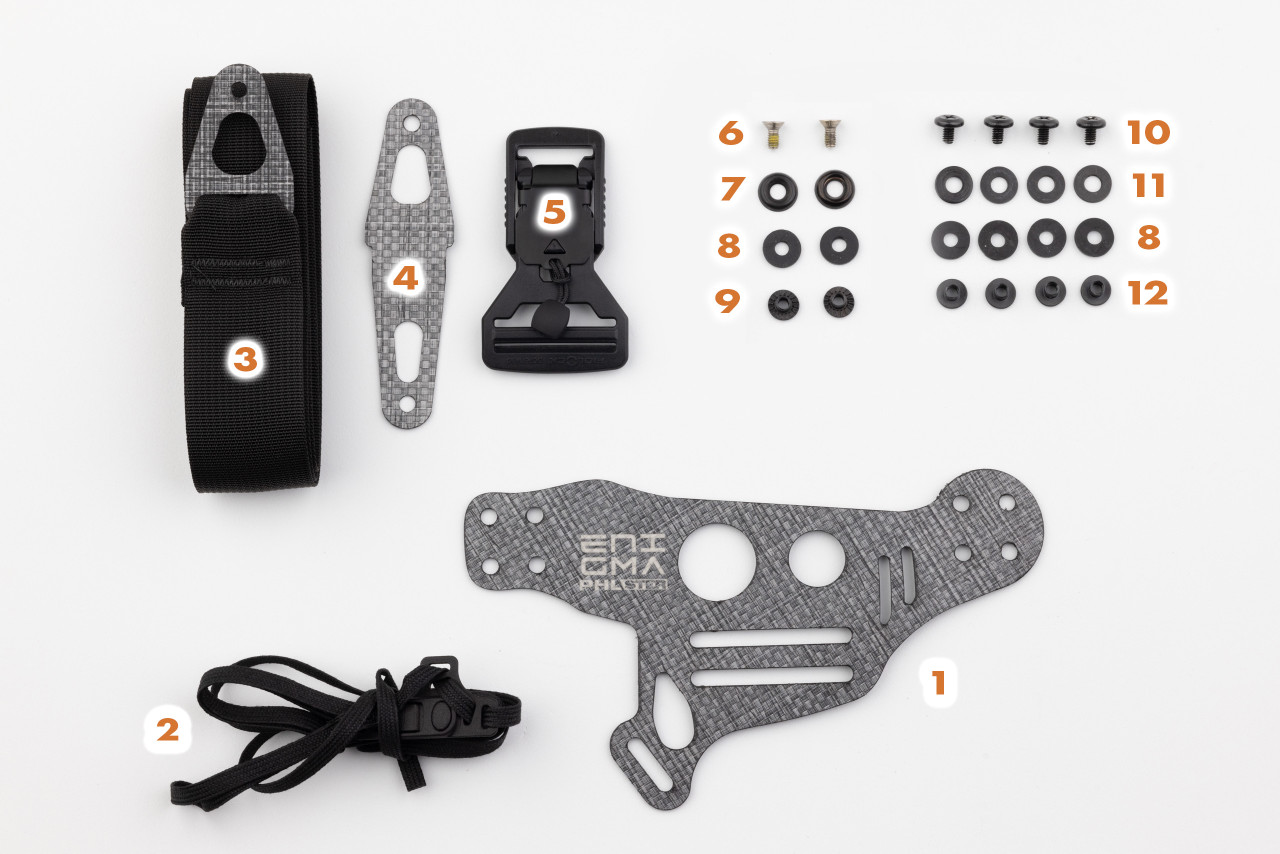
- Light Bearing Enigma faceplate
- Leg leash
- Belt
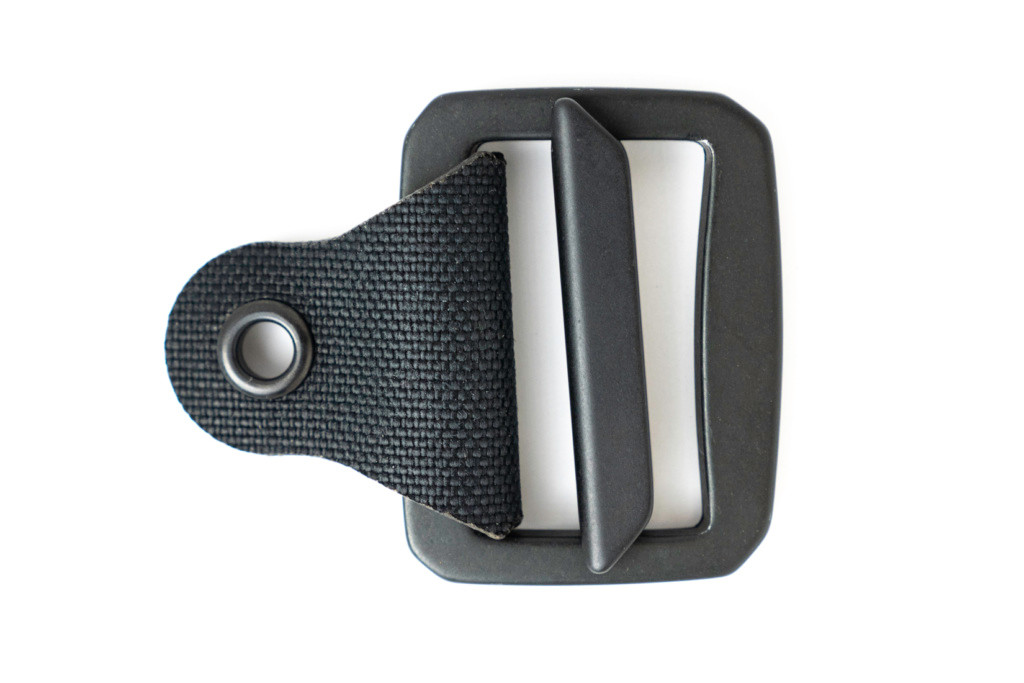
- Buckle capture
- Fidlock magnetic buckle
- Two black or silver tapered head screws with pre-applied Nylock thread locker (yellow goop on the threads)
- Two metal finish washers
- Six rubber washers
- Two short screw posts with serrated backs
- Four short truss head screws
- Four metal flat washers
- Four screw posts with slots
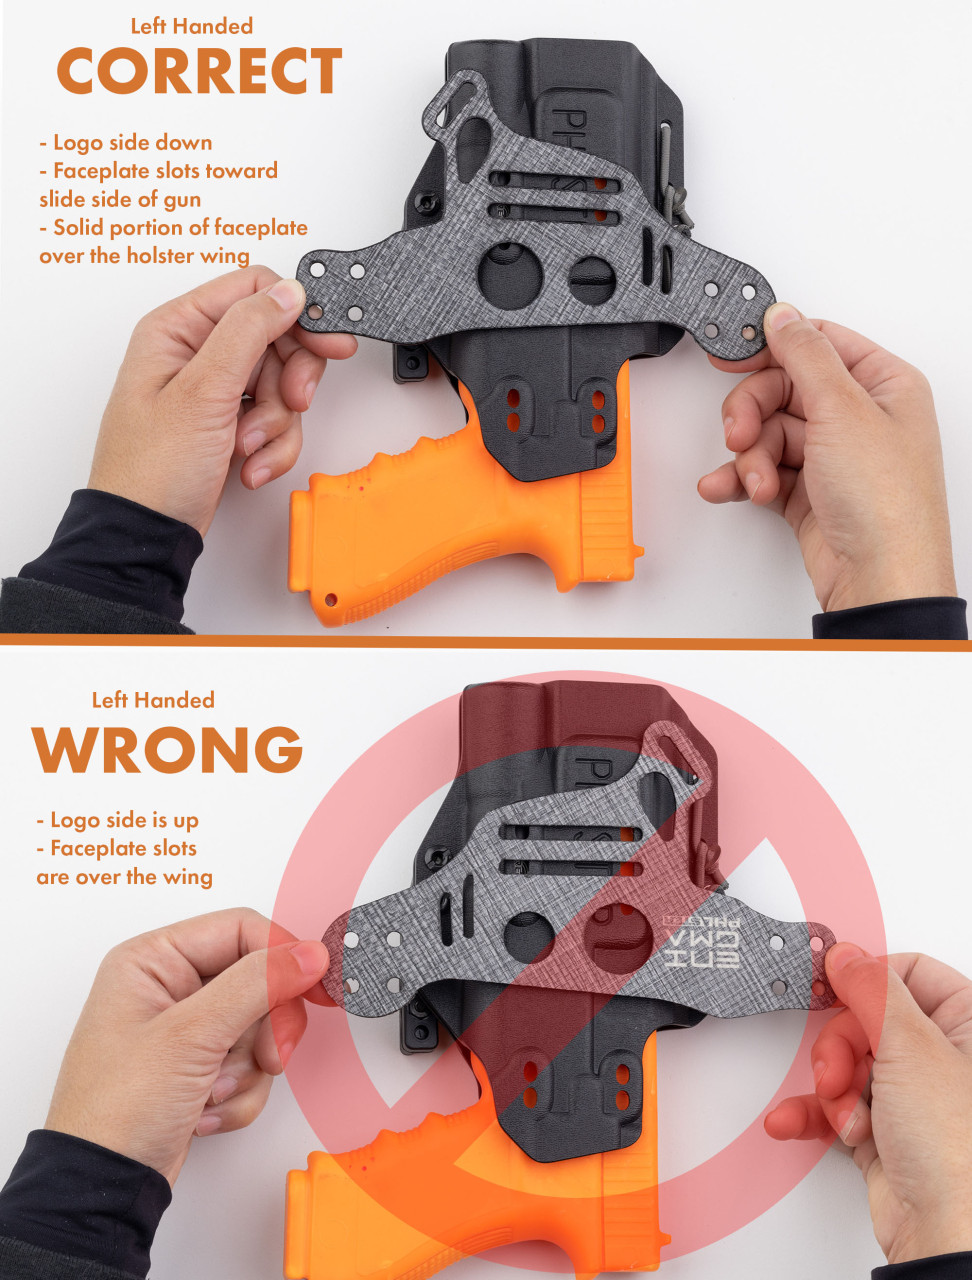
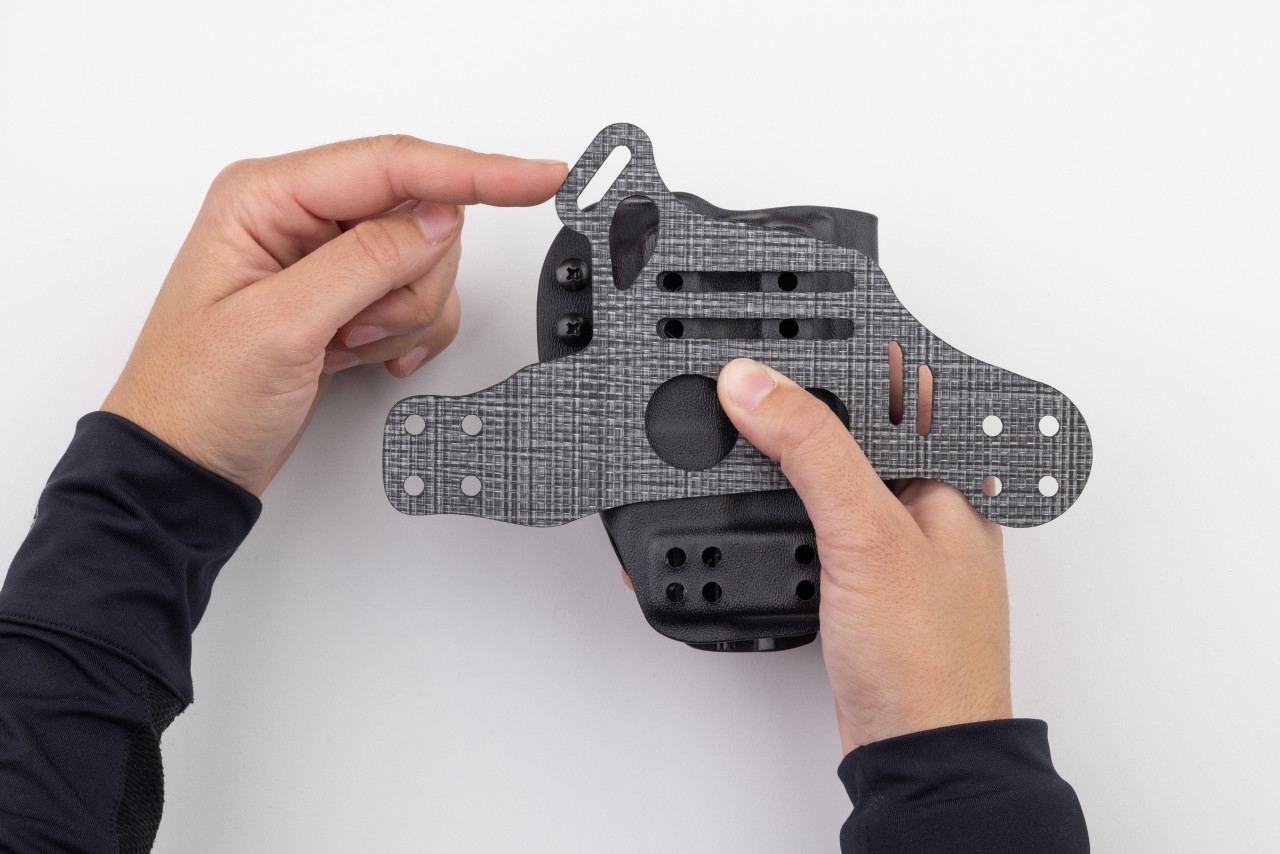
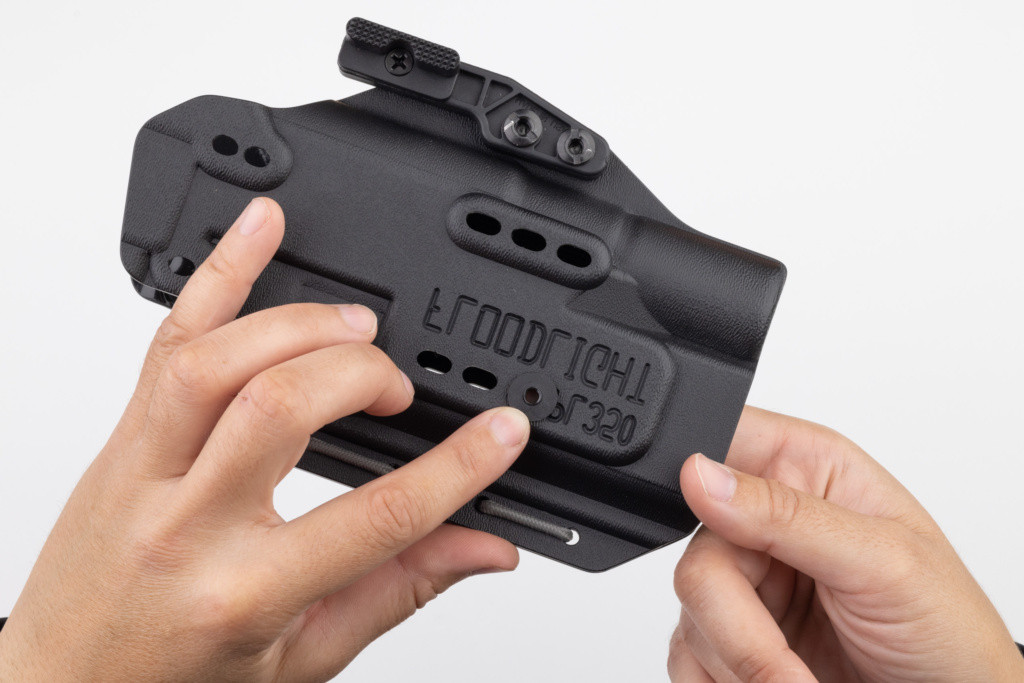
2. Orientation
To begin, determine the correct orientation of your holster shell on the Enigma faceplate. For left handed assembly, the logo side of the faceplate will be down. The blank side of the faceplate (1) will be referred to as the FRONT for a left handed assembly (the side WITHOUT the Enigma logo). You may find it helpful to mark this side “FRONT” with masking tape as a reminder.
3. Prepare Shell
Remove any belt clips, soft loops, or other belt hardware from your light bearing holster shell. Belt hardware is not necessary when using the Enigma. Do not remove the wing or the retention washers, as they are necessary for proper function of the holster.
Note: If your holster is ambidextrous, make sure the holster wing is set up correctly for left-handed use according to the manufacturer’s instructions. Contact the holster manufacturer directly if you have questions about their holster shell.
4. Prepare Buckle
Prepare your buckle capture (4) as shown.
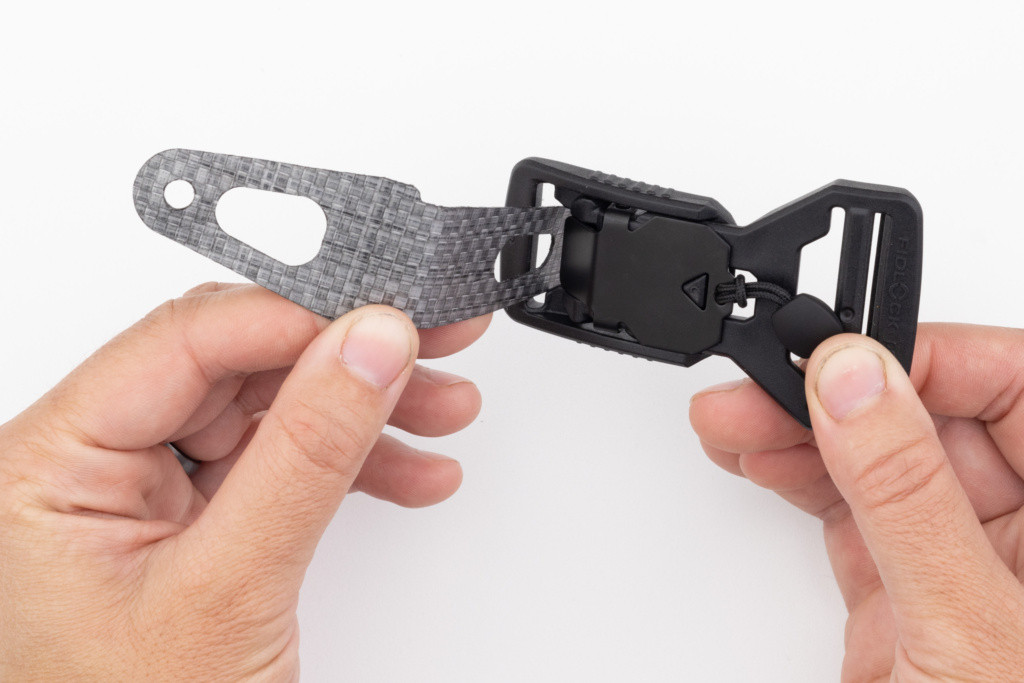
Thread the narrow side of the buckle capture (4) through the female side (narrow side) of the Fidlock magnetic buckle (5).
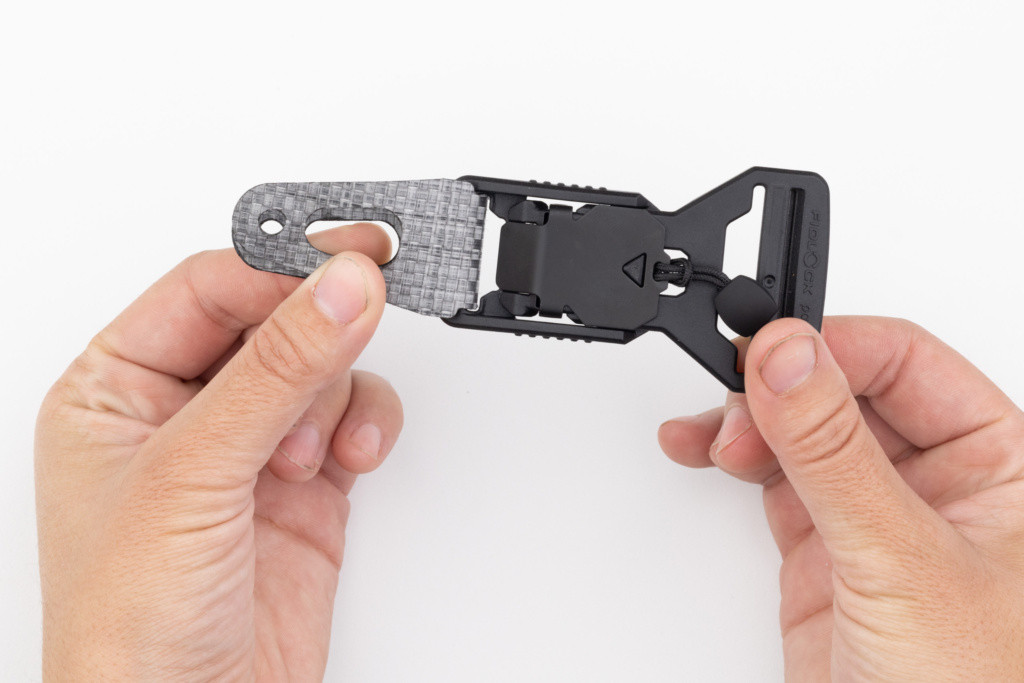
Pull through and even up the ends.
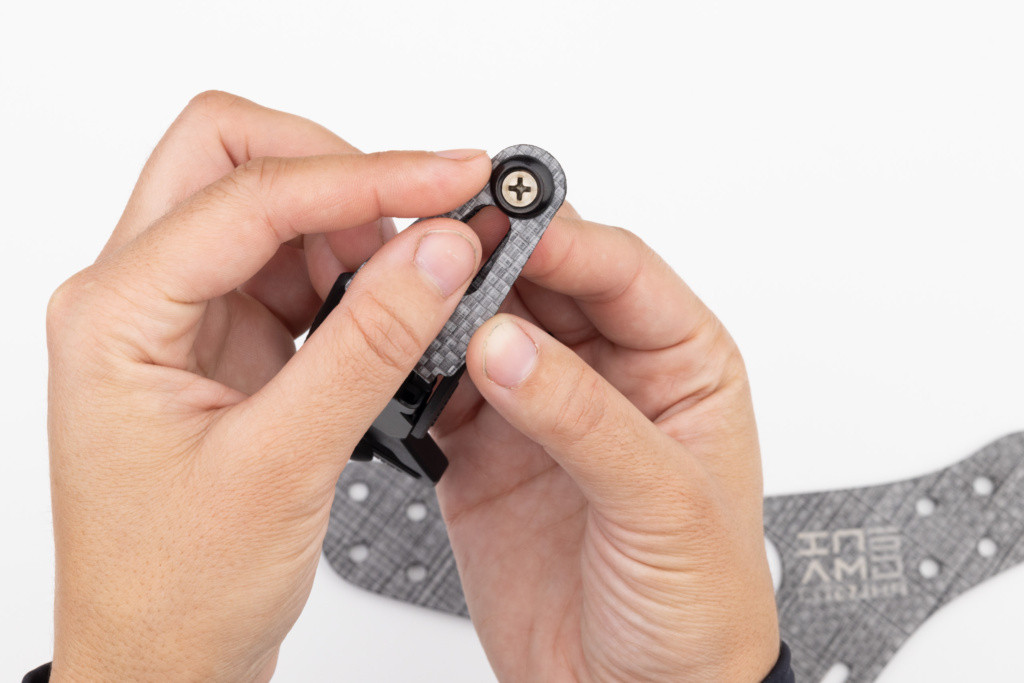
5. Prepare Screws
Prepare both of your tapered head screws (6).
These screws come with pre-applied thread-locking compound called Nylock. Nylock looks like yellow goop on the threads. It makes the screws harder to tighten (which is also why they’re less prone to loosening over time). It is reusable, and the screws can be tightened many times without losing grip.
To make the assembly process easier, prepare the tapered head screws as shown.
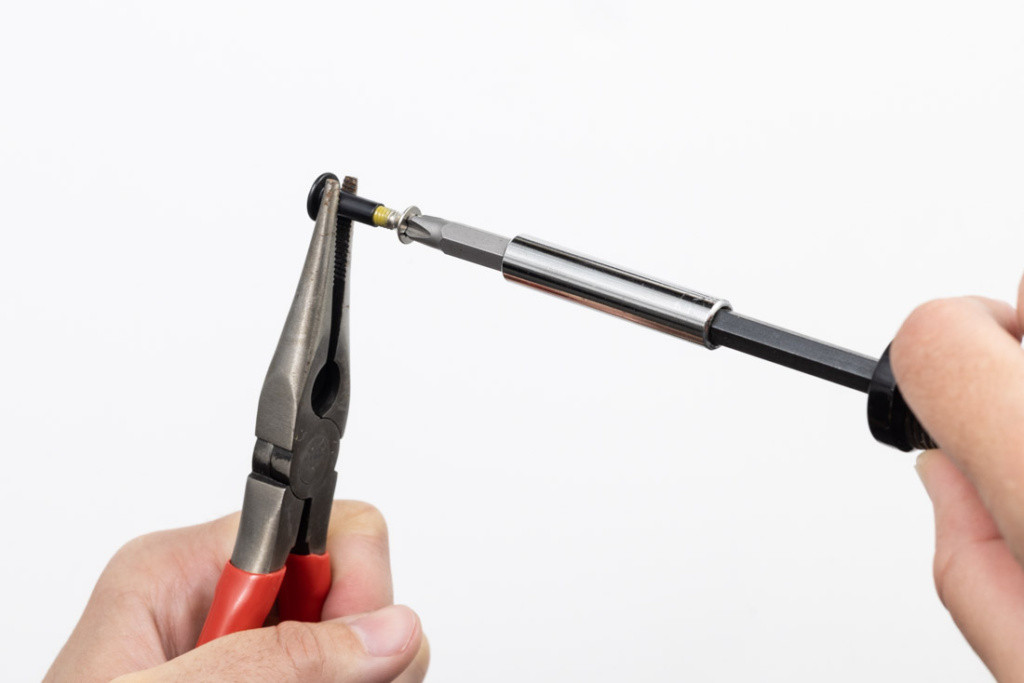
Use a pair of pliers or vice grips to hold one of the screw posts (9 – or you can use the long screw posts you set aside earlier). Insert each tapered head screw (6).
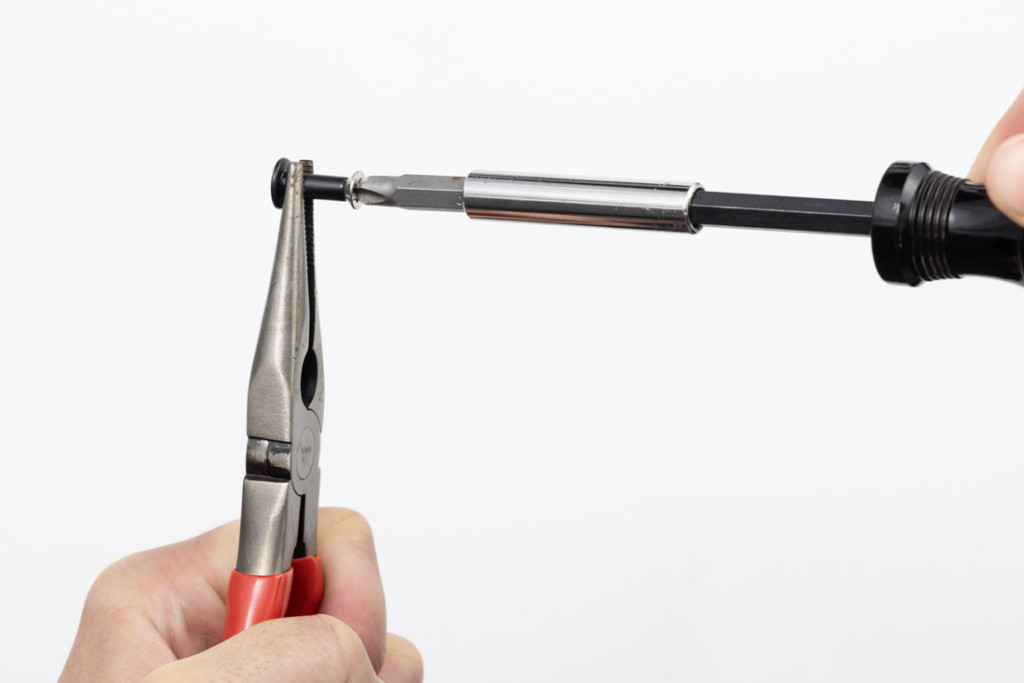
Tighten the screw into the screw post until it stops. This will set the Nylock, making it easier to attach your Enigma belt later. Remove the screw from the screw post and repeat with the other screw.
Note: You will feel some resistance when the Nylock engages. This is normal. Stop turning the screw when the screw head starts to touch the post.
Prepare both tapered head screws.
SAFETY WARNING: Do not remove the Nylock – it’s necessary for your Enigma to function correctly and safetly. Do not attempt to clean it off, and do not apply other thread-locking compounds on top of it.
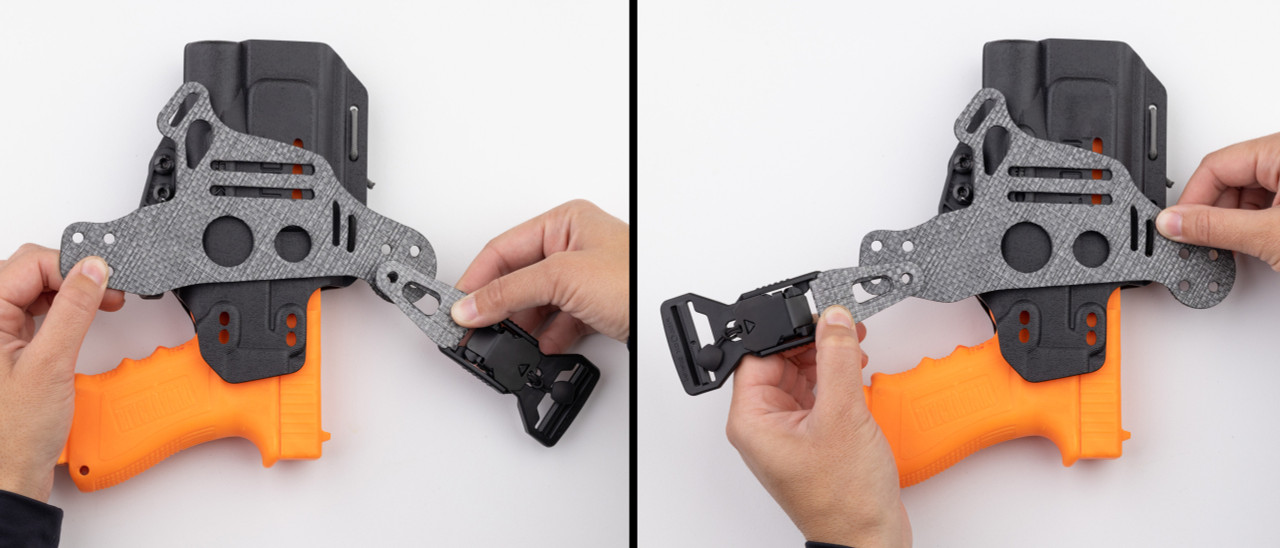
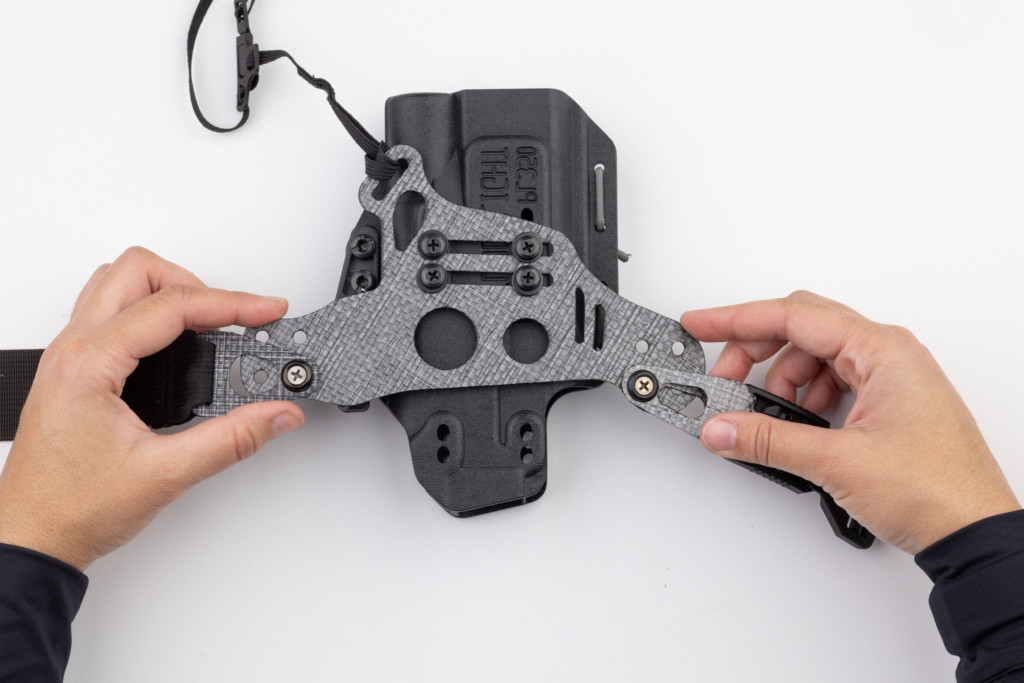
6. Attach Belt and Buckle
Attach both the belt (3) and buckle capture (4) to the FRONT of the faceplate. The buckle can be installed on either the left or right side of the faceplate, but most people prefer to have the buckle on their non-dominant hand side.
If you’re not sure which adjustment holes to use, start with the top, inner holes. When your assembly is complete, you can visit the adjustments section of the Light Bearing Enigma Instructions page for more information on how to adjust your Enigma for best concealment.
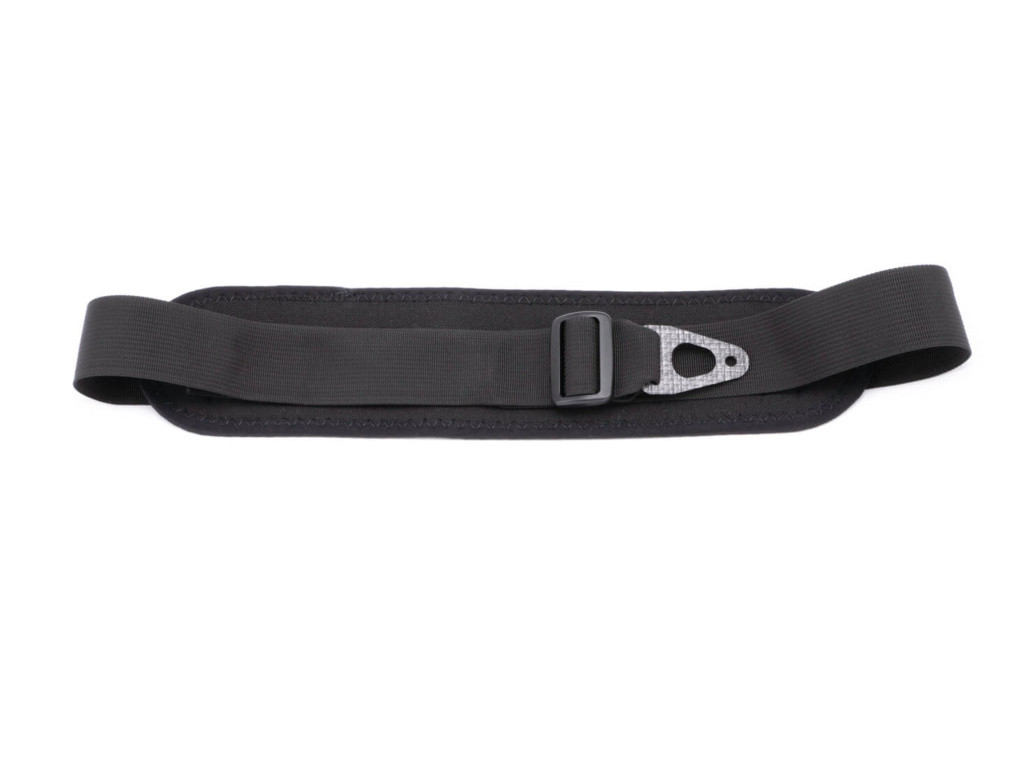
If you’re using the optional Sport Belt upgrade, install that instead of the regular belt (3). The belt attachment point is exactly the same.
If you’re using the optional Reduced Size Buckle, install that instead of the regular buckle capture (4) and Fidlock (5).
This is the hardware stack order for attaching the Enigma belt and buckle capture. From top to bottom:
- Silver tapered head screw (6)
- Metal finish washer (7)
- Belt attachment (3) OR buckle capture (4), or optional upgrades. Note that the buckle can be installed on the right or left side of the faceplate, depending on which hand you prefer to use to operate it
- Rubber washer (8)
- Enigma faceplate (1)
- Short screw post (9)
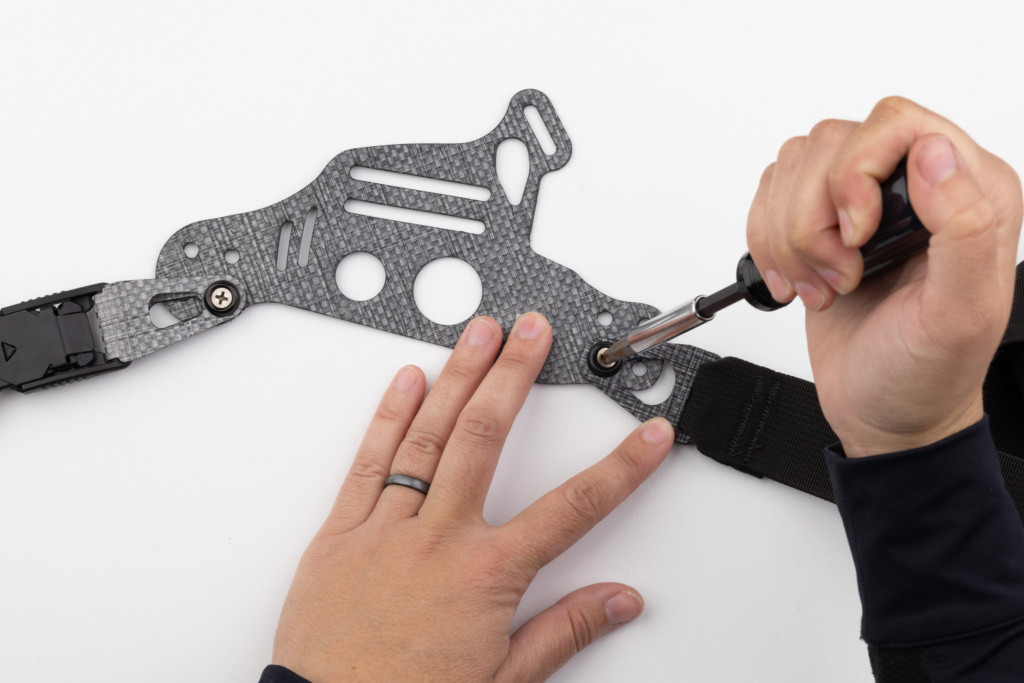
Drop the silver tapered head screws (6) through the finish washers (7) as shown. Push the screw through the small hole on the belt attachment or buckle capture.
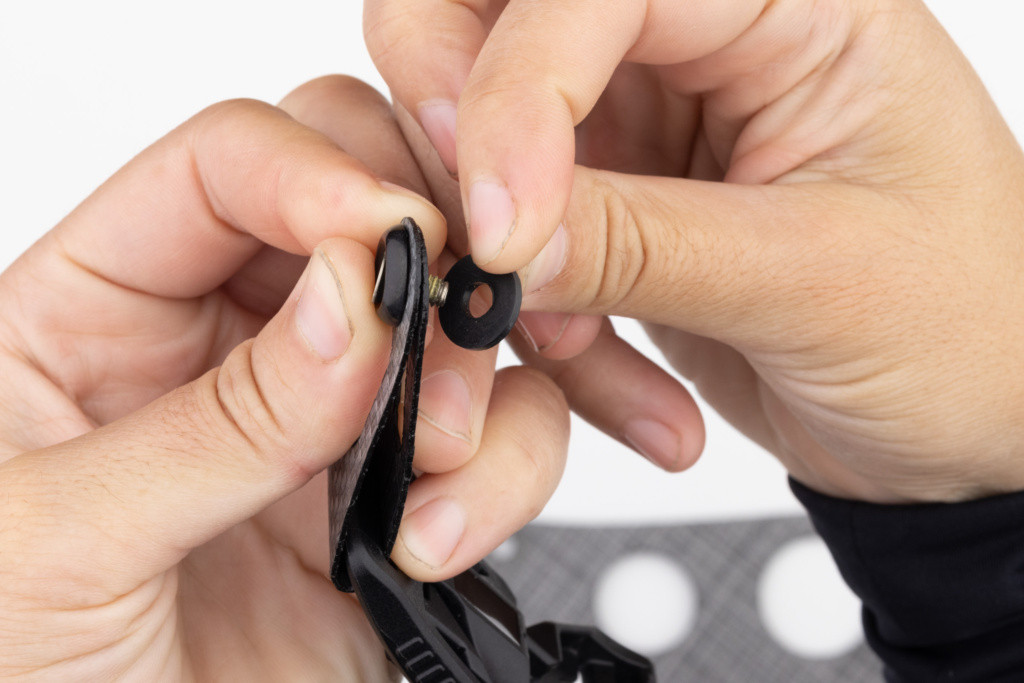
Next, add the rubber washer (8) behind the belt attachment or buckle capture.

Go through the selected hole on the FRONT of the Enigma faceplate. The rubber washer will be sandwiched between the belt/buckle attachment and the Enigma faceplate.
Add the short screw post (9) to the back of the faceplate.
Repeat these steps for both the belt and buckle capture.
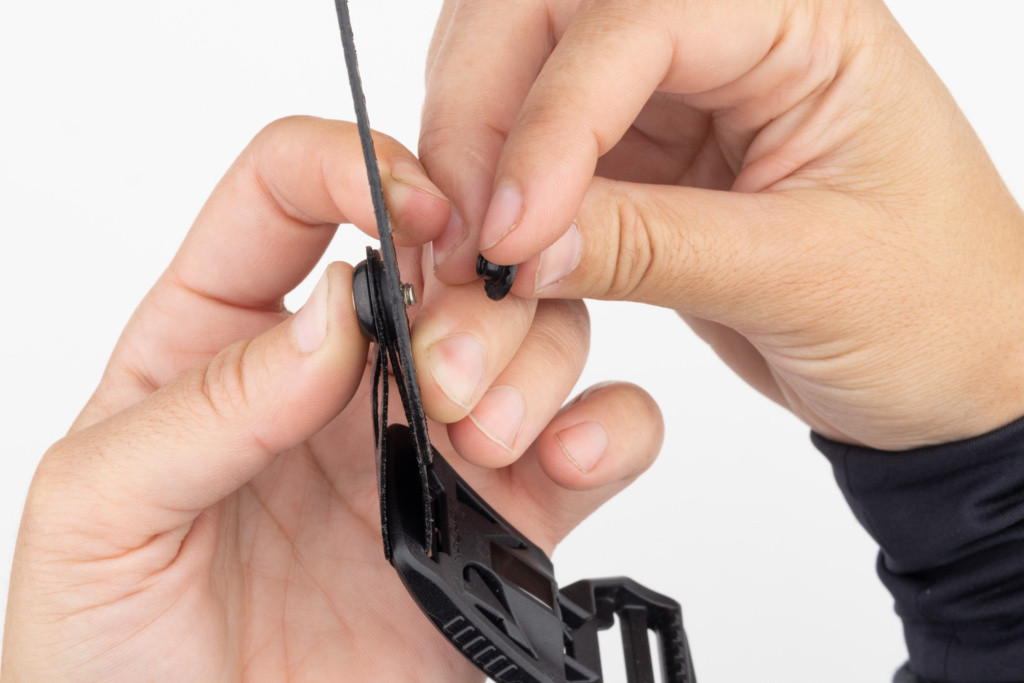
7. Tighten Belt Screws
Tighten the silver tapered head screws securely.
The silver tapered head screws are hard to tighten. Use a rubber band, rubber glove, or duct tape to grab the backside of the screw post.
Set the whole assembly (including the rubber band) down on a hard surface for extra leverage.
(Protect your surface in case you slip.)
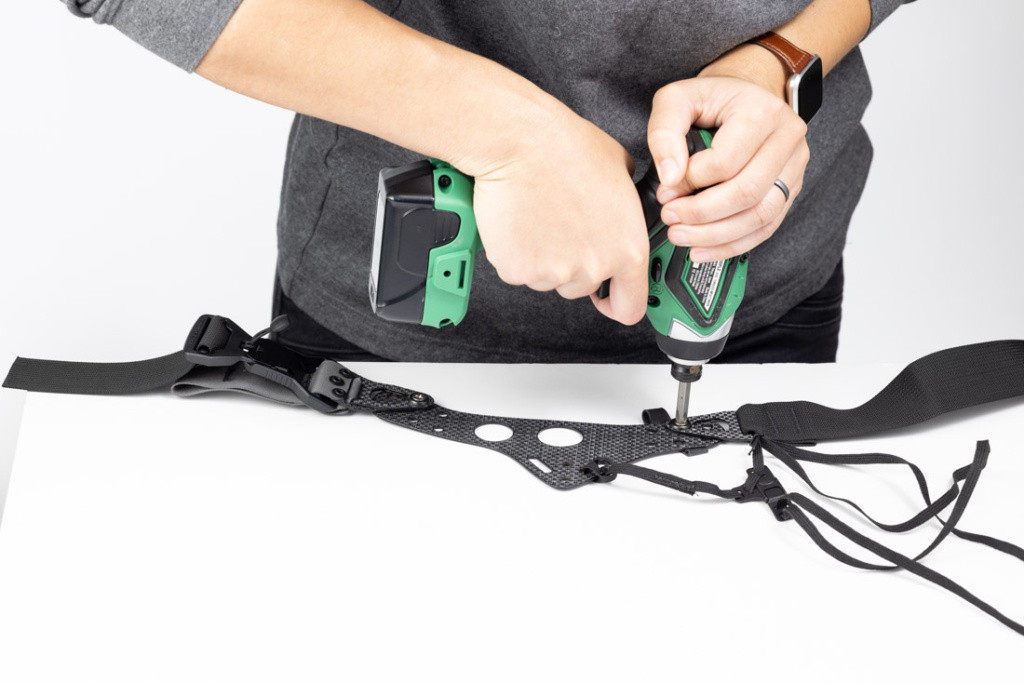
Recommended for people with low hand strength: Use a power driver + your body weight. Press down hard and power the screw in with short bursts.
Your belt attachments should be tight. They should be difficult to rotate on the Enigma faceplate.
NOTE: If your screws spin without tightening, try another method of gripping the screw posts. If you’re using a power driver, do not spin the screws excessively, or you will burn through your faceplate. If you’re having trouble, stop and use a different method. Enigma assembly tips here.
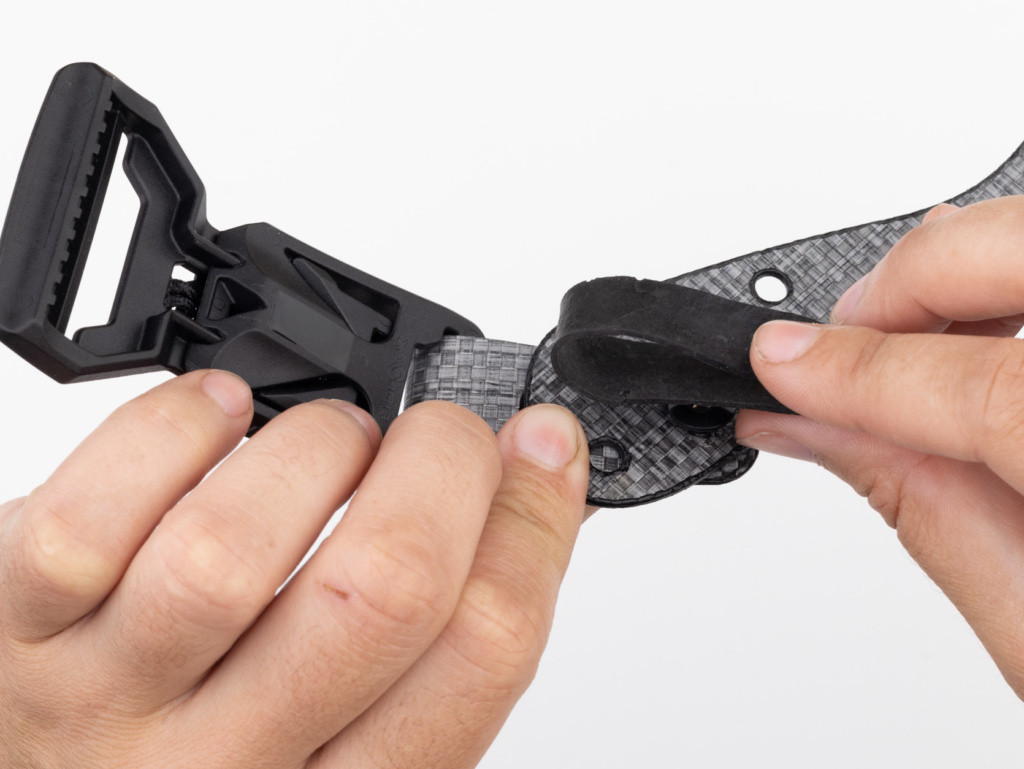
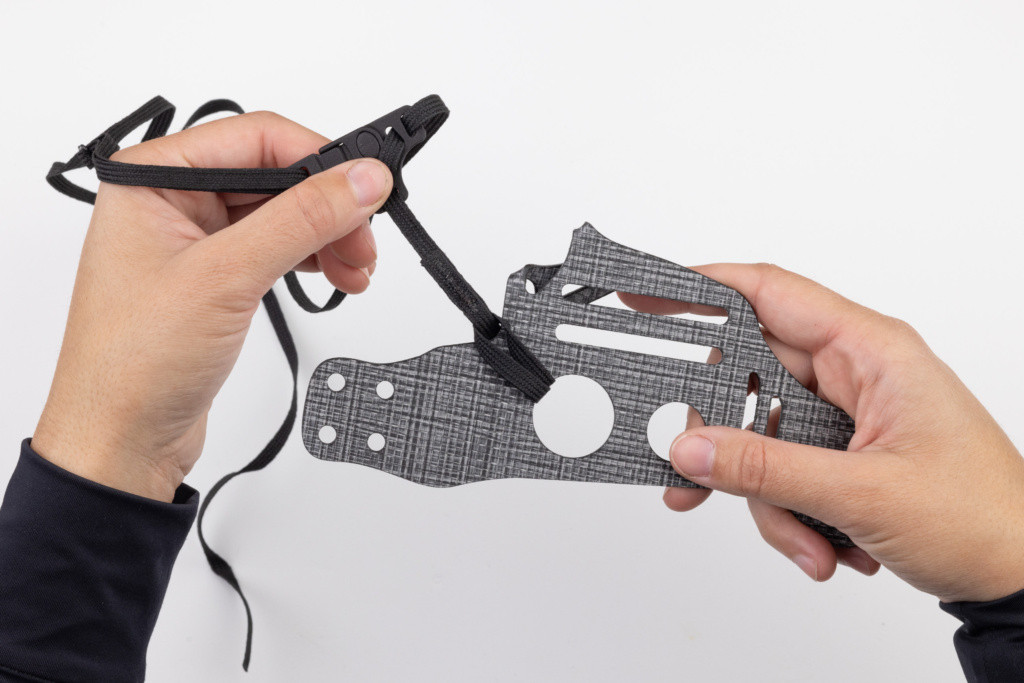
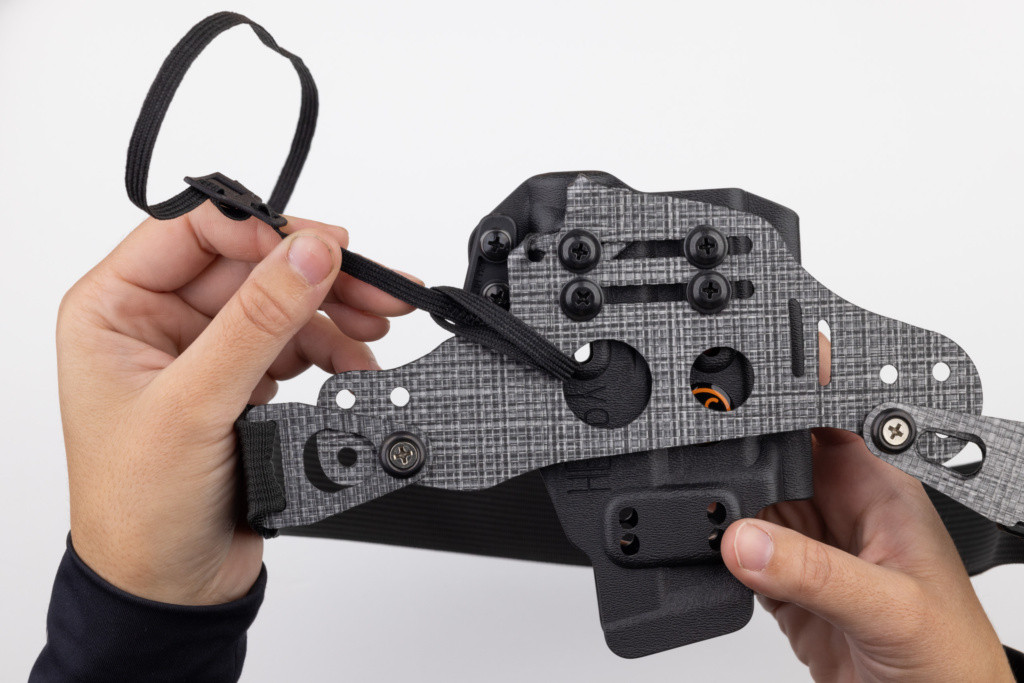
8. Attach Leg Leash

Attach your leg leash (2) to the faceplate. It can go through the leg leash tab at the bottom, or through the larger faceplate hole (if your holster is shorter than the faceplate, see below).
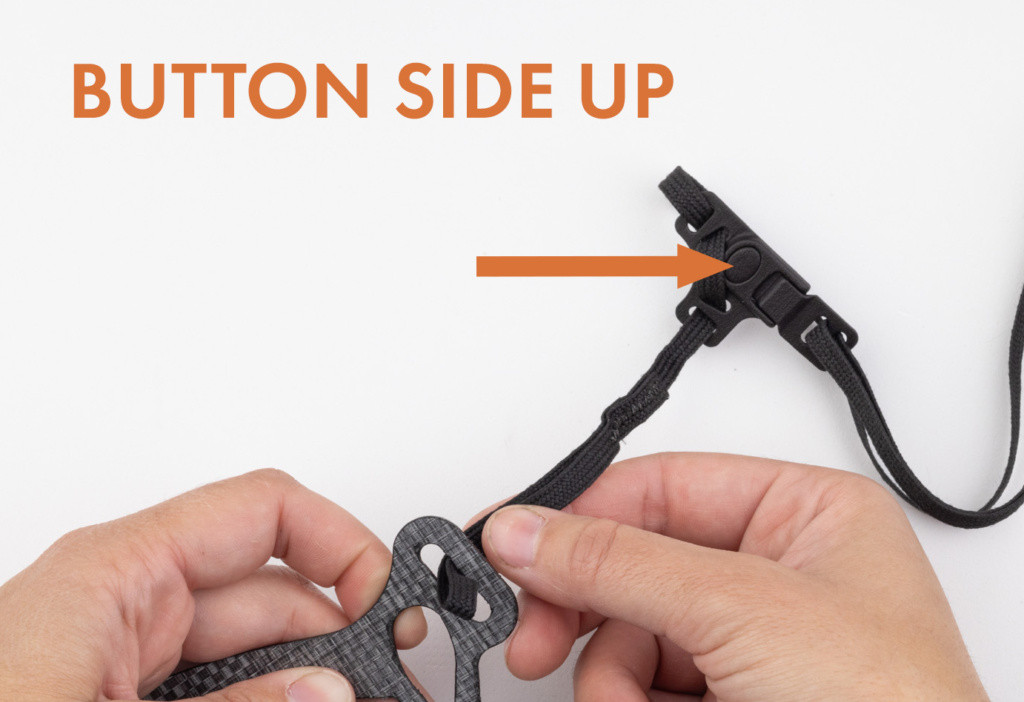
Pass the loop of the leg leash through the slot. Pass the body of the leg leash through the loop, forming a girth hitch. Make sure your leg leash buckle faces up as shown.
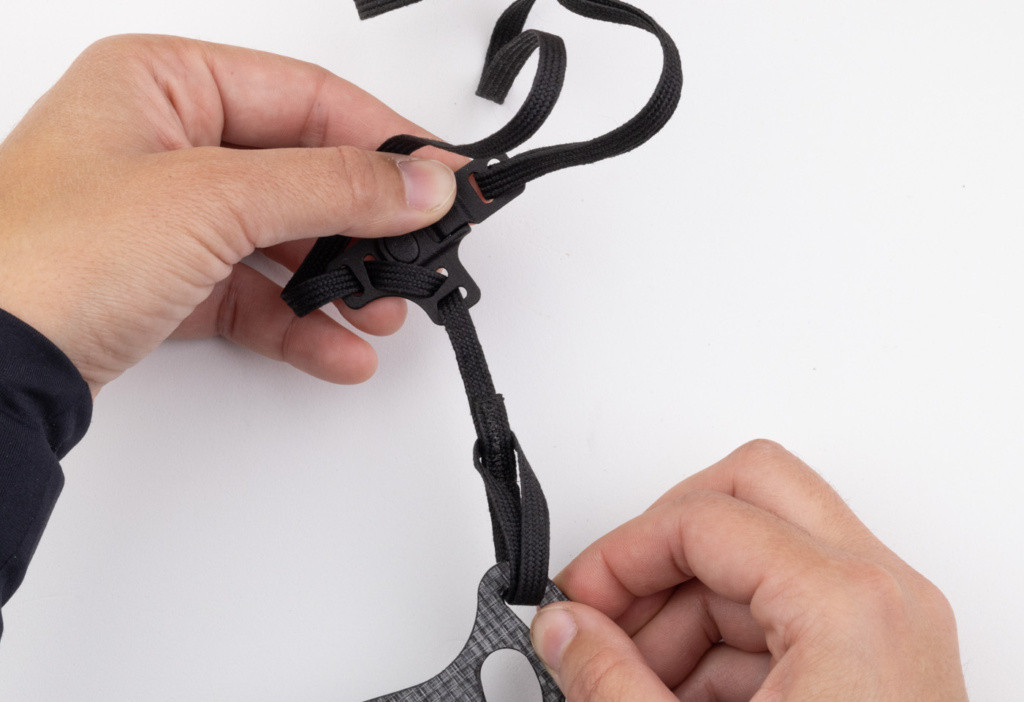
Pull tight, making sure the drop portion of the leash isn’t twisted.
9. (Optional) Fold Leg Leash Tab
If you have the legacy version of the Light Bearing Enigma, it will have a leg leash tab (newer versions do not have the tab, so you can ignore this.)
The LBE was designed for the Floodlight holster, which accommodates full size lights and duty-sized weapons. If your holster shell is smaller than the floodlight, the leg leash attachment point may stick out past the shell, which can make it dig into your thigh when seated.
When using the LBE with a smaller shell, you can solve this issue by folding the leg leash attachment under the faceplate and trapping it under the faceplate or under the nearest screw.
NOTE: Normally we say not to crease the faceplate material, however the leg leash is a low stress part, so this is fine. Folding the leg leash as directed in the instructions does not void your warranty.
SAFETY WARNING:DO NOT CUT YOUR FACEPLATE. See the Enigma Safety page for more details.
Fold the leg leash tab under the faceplate.
Line the tab up with the faceplate slot and crease flat.
You can attach the leg leash through the larger faceplate hole.
In the next step, you will attach your holster. Trap the leg leash tab between the faceplate and holster. It will end up looking like this when you are done.
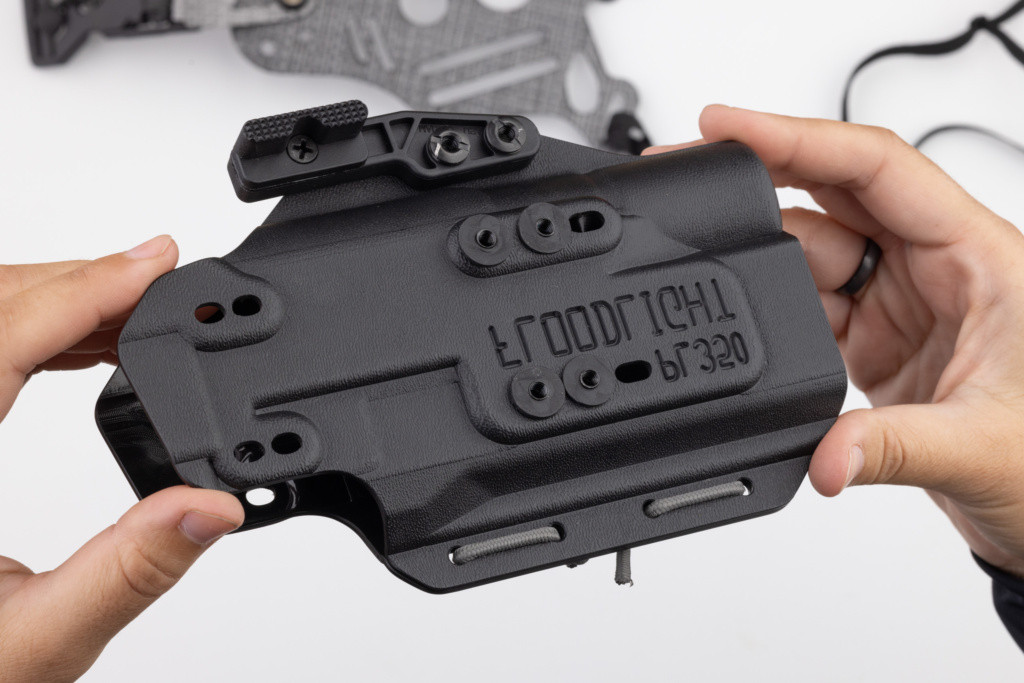
10. Attach Holster
Attach your holster to the faceplate. The order of the hardware stack is as follows:
- Four short truss head screws (10)
- Four metal flat washers (11)
- Enigma faceplate (1)
- Four rubber washers (8)
- Holster shell
- Four screw posts with slots (12)
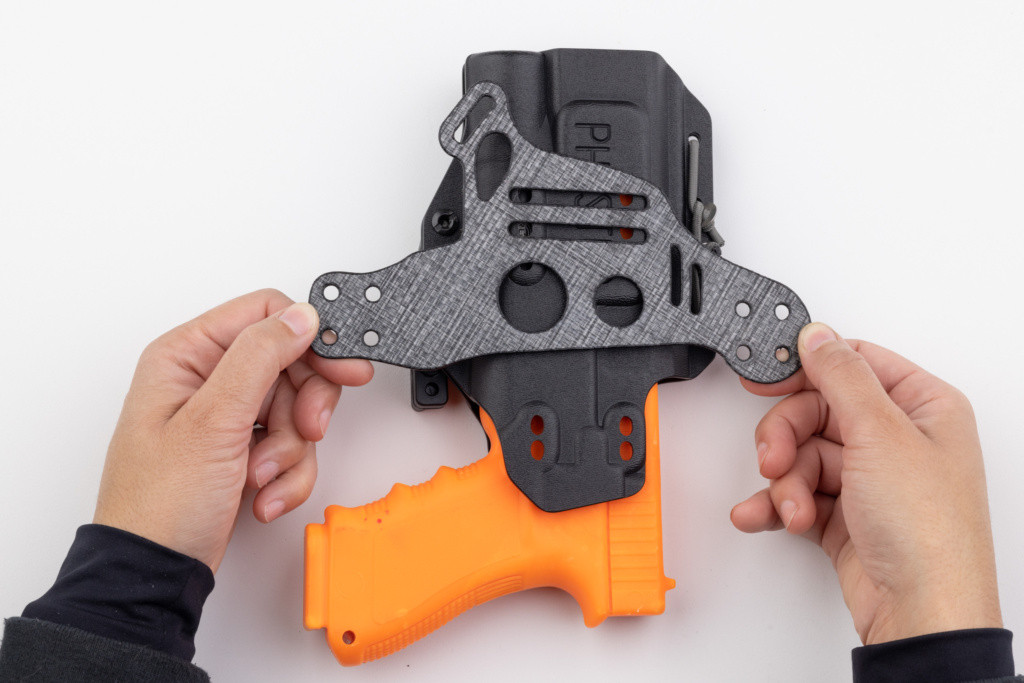
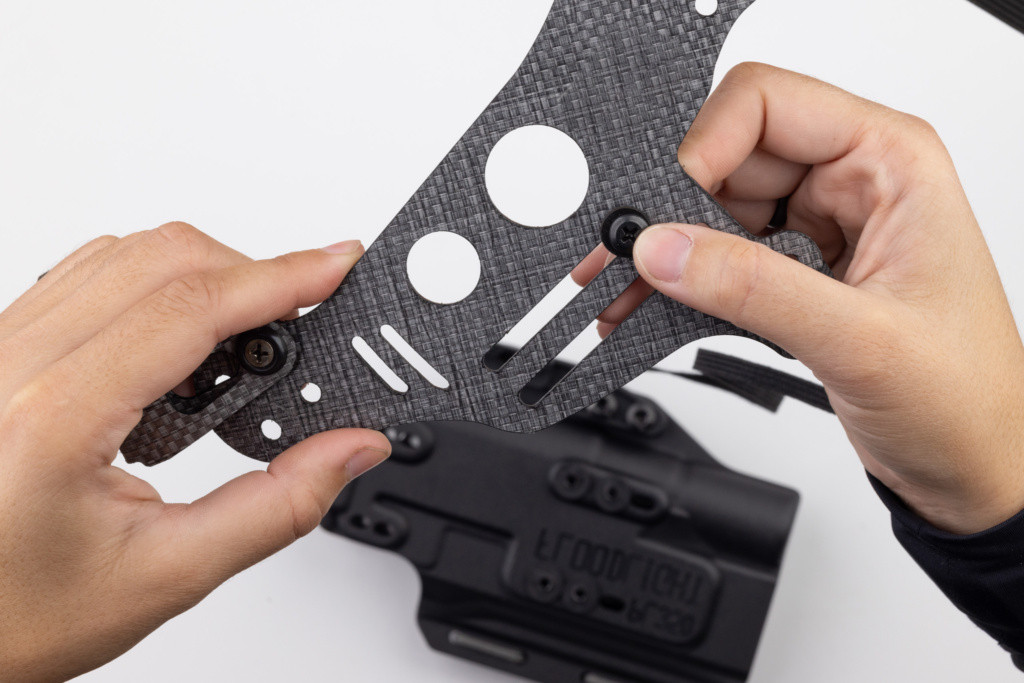
First dry fit the Enigma faceplate onto the holster so you can decide which mounting holes you will use. Make sure the top of the wing is roughly even with the faceplate.

Then grab the screw posts (12) and the rubber washers (8).
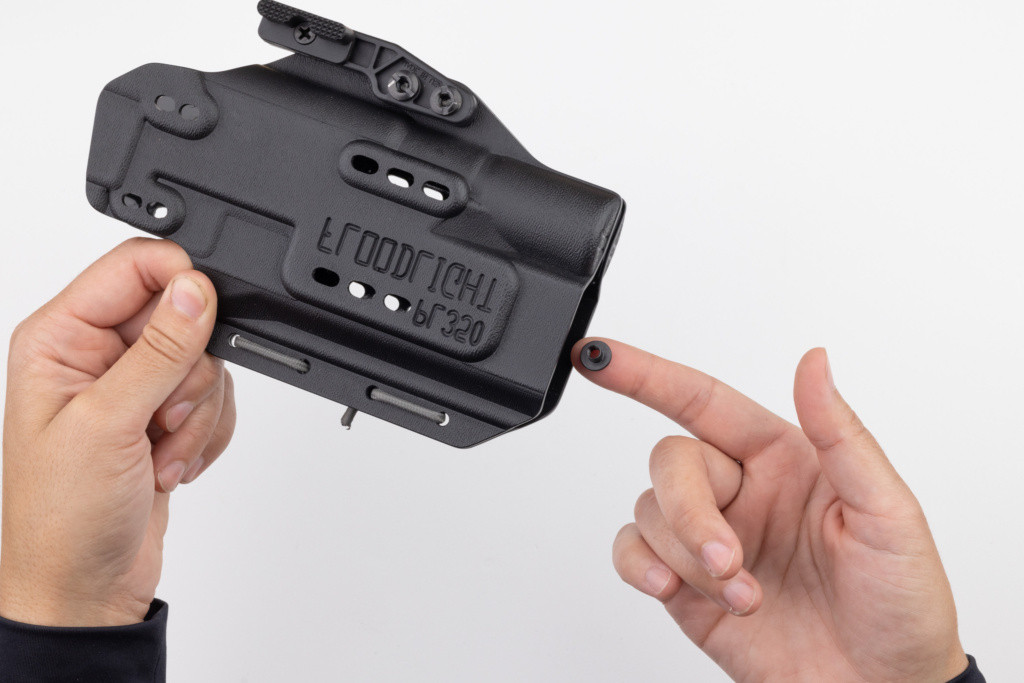
Place the screw posts (12) into the mounting holes through the inside of the holster.
(Note: some pictures are reversed to appear left handed for ease of following along. Please ignore the text on the holster shell, as yours will not look exactly the same.)
Support the post with your finger from the inside, and add the rubber washer (8) on top of the holster shell. The washer will help the post stay in place when you let go of it.
Repeat this step with all four screw posts.
Put the truss head screw (10) through the metal washer (11), and put both through the FRONT of the Enigma faceplate.
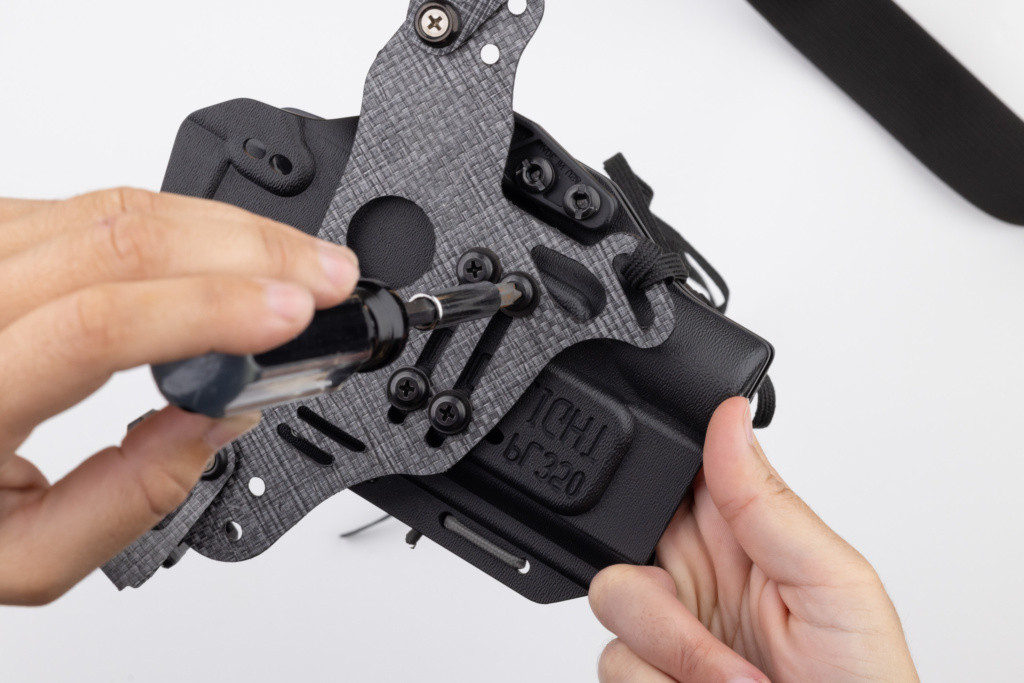
Support the screw post from the back as you tighten the screw. Leave the screws a little loose until the next step.
Repeat the above steps to install all four mounting screws. Before fully tightening the screws, adjust the faceplate so that it’s lined up the way you want it. Then fully tighten all four screws.
NOTE: The faceplate screws need to be tight. Once you have finished trying on and adjusting your Enigma, use thread-locker on your faceplate screws. We highly recommend VibraTite VC3, which is a reusable thread-locking compound.
11. Connect Belt
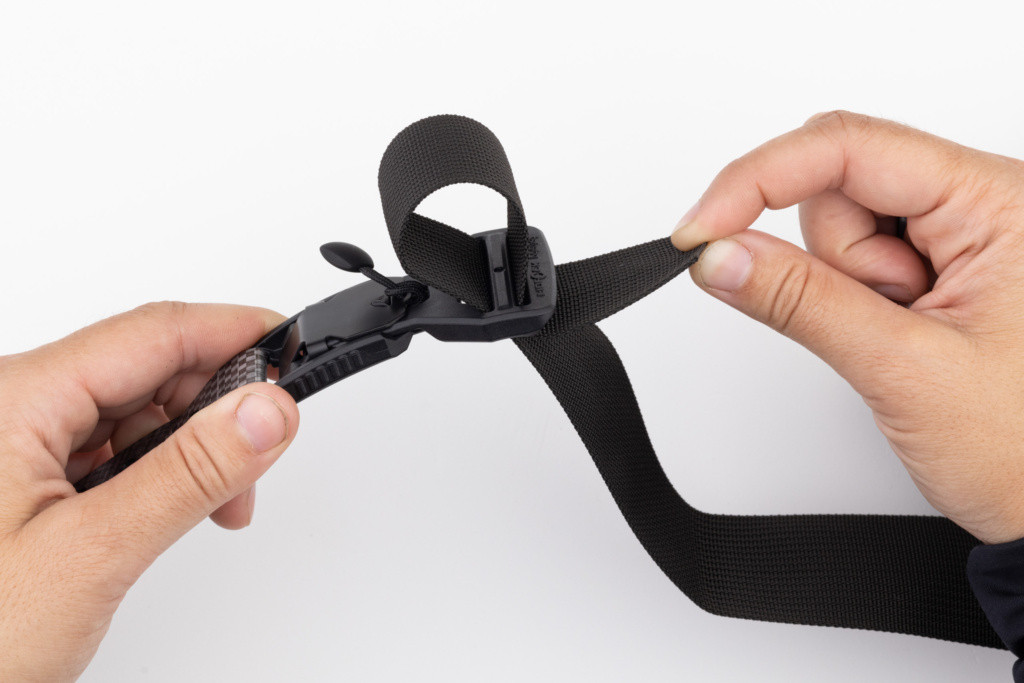
Take the free end of the belt (3) or optional sport belt upgrade, and pass it through the Fidlock buckle as shown. The loose tail of the belt should be on the outside when you wear it.
Last step!
Double check your setup carefully to make sure everything is correct. It’s easy to miss things, so take some time to make sure you completed each step correctly.
